Blog

  • Vexor-Exodus-Wallet-Integrations-API-Usage-Web3-WalletConnect

    Exodus Integrations and API Usage Project

    Overview:

    The primary objective of this project is to seamlessly integrate with the Exodus platform and leverage its robust API to establish connections with a diverse range of applications and services. This integration will unlock a multitude of opportunities for enhanced functionality, data sharing, and automation across various platforms. In this document, we will delve into the comprehensive details of this ambitious integration project.

    Project Scope:

    The project scope encompasses several key aspects, including but not limited to:

    1. API Integration: We will work closely with the Exodus platform’s API to establish secure and reliable connections. This will involve a deep understanding of the API endpoints, authentication mechanisms, and data formats.

    2. Application Compatibility: Our integration efforts will ensure compatibility with a wide array of applications and services, spanning different industries and use cases. This includes popular software suites, IoT devices, cloud services, and more.

    3. Data Exchange: The project will facilitate the seamless exchange of data between the Exodus platform and connected applications. This will enable real-time data sharing, synchronization, and analytics.

    4. Functionality Enhancement: By integrating with the Exodus platform, we aim to enhance the functionality of connected applications. This may involve adding features such as automated data backups, secure file transfers, and multi-platform notifications.

    5. Security and Compliance: Security is paramount in this project. We will implement robust security measures to protect data during transit and at rest. Compliance with data privacy regulations, such as GDPR and HIPAA, will be a key consideration.

    6. Scalability: The integration architecture will be designed to accommodate future growth and scalability. This ensures that additional applications and services can be seamlessly added to the ecosystem as the need arises.

    Project Timeline:

    The timeline for this project will be divided into several phases, including:

    1. Planning and Analysis: In this initial phase, we will conduct a thorough analysis of the Exodus API and identify the integration requirements.

    2. Development: The development phase will involve building the necessary connectors and middleware to enable communication between the Exodus platform and various applications.

    3. Testing: Rigorous testing will be conducted to ensure the reliability, security, and performance of the integration.

    4. Deployment: Once testing is successful, the integration will be deployed, and initial connections with select applications will be established.

    5. Optimization: Continuous optimization and refinement will be carried out to enhance the integration’s efficiency and effectiveness.

    6. Scaling and Maintenance: As more applications are integrated, the system will be regularly maintained and scaled to meet growing demands.

    Requirements

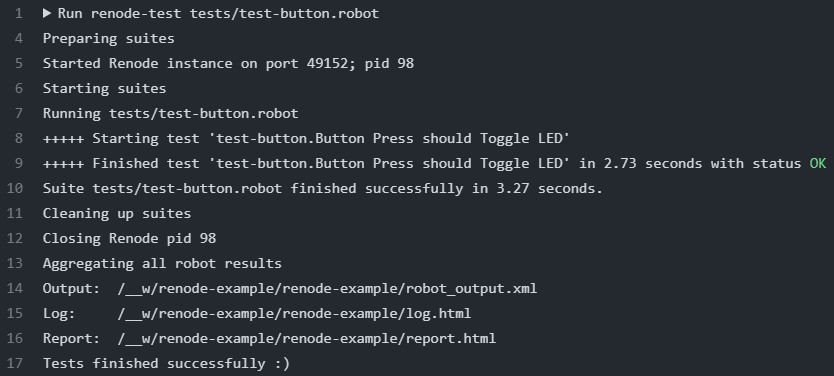
    To run your project, make sure you have the following requirements:

    • Python 3.6+
    • Flask framework
    • Exodus API access (API keys and access permissions)

    Installation

    To run and develop your project, follow these steps:

    1. Clone the project from this repository:
    git clone https://github.com/yourusername/yourproject.git
    1. Navigate to the project folder:
    cd yourproject
    1. Install the required dependencies:
    pip install -r requirements.txt
    1. Set up the configuration file and add your API keys:
    cp config.example.ini config.ini
    1. Start the application:
    python app.py
    1. Open your browser and go to http://localhost:5000 to begin using the application.

    Usage

    Provide detailed instructions on how to use your project. Explain the steps users should follow to gain API access and make integrations.

    Project Team:

    To successfully execute this project, a dedicated team with diverse skills will be assembled. This team may include:

    • Project Manager – Cole Chandler
    • Software Developers – Jose West, Melvin Quinn
    • API Specialists – Lloyd Barton, Kyran Gibbs
    • Security Experts – Ajay Ayala, Lloyd Barton

    Project Benefits:

    The successful integration with the Exodus platform will bring numerous benefits, including:

    • Streamlined data sharing and automation across various applications.
    • Improved productivity and efficiency for users of connected applications.
    • Enhanced data security and compliance with industry regulations.
    • Scalability to accommodate future growth and new applications.
    • Potential for revenue generation through premium features and services.

    API Documentation

    For more information on using the Exodus API, refer to the API documentation.

    Contributing

    If you’d like to contribute to this project, please follow these steps:

    1. Fork this project.
    2. Create a new branch: git checkout -b feature/your-feature-name
    3. Commit your changes: git commit -m 'Add new feature'
    4. Publish your changes in your fork: git push origin feature/your-feature-name
    5. Open a pull request.

    Conclusion:

    The integration with the Exodus platform represents a significant opportunity to create a robust and interconnected ecosystem of applications and services. This project will require careful planning, technical expertise, and a commitment to delivering a secure and reliable integration solution. As we embark on this journey, we anticipate unlocking new possibilities and delivering substantial value to our users and partners.

    Open source code is a fundamental pillar of our project’s success, especially in our integration with the Exodus platform. It embodies our dedication to transparency, collaboration, and innovation. In this discussion, we will delve into the significance of open source code and how it benefits both our project and the wider developer community.

    Transparency and Accountability:

    Open source code brings unparalleled transparency to our project. By providing public access to our source code, we establish trust with users, partners, and stakeholders. Anyone can review the code to ensure it adheres to best practices, security standards, and ethical guidelines. This transparency holds us accountable for the quality and integrity of our integration solution.

    Community Collaboration:

    The essence of open source projects is community collaboration. By open-sourcing our code, we invite developers from around the world to contribute their expertise, ideas, and enhancements. This collective effort accelerates development, resolves bugs, and introduces innovative features.

    Knowledge Sharing:

    Openly sharing code promotes knowledge exchange. Developers can gain insights into integration strategies, API interactions, and best practices by studying our codebase. This educational facet of open source benefits both seasoned developers and those looking to enhance their skills.

    Flexibility and Customization:

    Open source code empowers users to tailor the integration to their specific needs. They can modify the codebase to seamlessly integrate with their unique set of applications and services, thus ensuring the solution aligns precisely with their requirements.

    Cost-Efficiency:

    Open source code can dramatically reduce development costs. Leveraging existing open source libraries, frameworks, and components expedites development while keeping expenses in check. This cost-effectiveness is particularly valuable for projects operating within limited budgets.

    Long-Term Sustainability:

    Open source code offers the promise of long-term sustainability. Even if the original development team evolves or disbands, the open source community can continue to maintain and enhance the codebase. This guarantees the integration remains viable and up-to-date.

    Licensing and Legal Compliance:

    When sharing code as open source, selecting an appropriate open source license is crucial. This license clarifies how the code can be used, modified, and distributed, ensuring legal compliance while safeguarding intellectual property rights.

    In conclusion, embracing open source code as a fundamental aspect of our integration project with the Exodus platform aligns seamlessly with our commitment to transparency, collaboration, and innovation. By doing so, we not only elevate the quality and sustainability of our integration but also contribute significantly to the broader developer community. This fosters a culture of shared knowledge and progress. Open source code stands as a cornerstone of our project’s success, with a positive impact extending throughout the technology landscape.

    License

    This project is licensed under the Project License. For more details, check the license file.


    Visit original content creator repository
    https://github.com/automiation63y/Vexor-Exodus-Wallet-Integrations-API-Usage-Web3-WalletConnect

  • evoldir-bluesky

    Pushing EvolDir posts to BlueSky

    A simple script to fetch posts from the EvolDir mailing list run by Brian Golding.

    When run the script fetches the last three days of EvolDir posts as text files, parses them, and extracts the individual posts. It computes the MD5 hash of the text of each post and stores each post using the hash as the file name. This enables us to test whether we’ve encountered the post before. By fetching the last three days we minimise the chances that we miss a post.

    Each new post is prepared for BlueSky by using OpenAI to construct a short summary of the post, asking it to include a single relevant URL (which we hope is a link to a job website, a conference announcement, etc.). We append hash tags based on the heading of the post.

    The BlueSky API is then used to enhance the post by extracting “facets” such as ash tags and links. We attempt to construct a “card” for a link by fetching the content pointed to by the link and looking for og:title, og:description, and og:image tags in the web page. This assumes that the web site supports Open Graph Markup. In the future I may look at supporting other tags, as well as oEmbed.

    The enhanced post is then sent to BlueSky.

    Visit original content creator repository
    https://github.com/rdmpage/evoldir-bluesky

  • NIST-password-ts

    NIST Password Validator Library

    A lightweight, zero-dependency open-source password validator adhering to NIST guidelines.

    Try it out: Test the library with a user-friendly front-end demo site.


    Introduction

    This library provides a robust solution for password validation based on the NIST Digital Identity Guidelines (SP 800-63B). It promotes modern password security with support for Unicode, breach checks, customizable rules, and advanced features like error limits for flexible feedback.


    Why NIST Guidelines?

    Passwords are a cornerstone of digital security. The National Institute of Standards and Technology (NIST) has established guidelines to improve password policies with principles like:

    • Minimum Length: At least 8 characters; 15+ recommended.
    • Maximum Length: Support up to 64+ characters.
    • No Arbitrary Composition Rules: Avoid forcing special characters or case mixing.
    • Unicode Support: Inclusive acceptance of all Unicode characters.
    • Compromised Password Checks: Block passwords found in breaches.
    • Blocklist with Fuzzy Matching: Prevent predictable or context-specific terms.

    This library implements these principles to enhance security and usability.


    Features

    • NIST-Compliant Validation:
      • Unicode-based minimum/maximum length checks.
      • Smart whitespace handling.
    • Error Limiting:
      • Control the number of errors returned for a password.
      • Balance detailed feedback and performance.
    • HIBP Integration:
      • Check passwords against the Have I Been Pwned (HIBP) breach database.
    • Blocklist with Fuzzy Matching:
      • Detect passwords similar to blocklisted terms.
      • Customizable sensitivity and matching rules.
    • Flexible Configuration:
      • Adjustable length limits, blocklists, and sensitivity.
      • Toggle HIBP checks for local environments.

    Installation

    Install via npm:

    npm install nist-password-validator

    Usage

    Basic Example

    import { validatePassword } from "nist-password-validator";
    
    async function checkPassword() {
      const result = await validatePassword("examplepassword");
      if (!result.isValid) {
        console.log("Password validation failed:", result.errors);
      } else {
        console.log("Password is valid!");
      }
    }
    
    checkPassword();

    Using the PasswordValidator Class

    For scenarios where you need to reuse the same validation configuration or update it dynamically:

    import { PasswordValidator } from "nist-password-validator";
    
    // Create a validator with initial options
    const validator = new PasswordValidator({
      minLength: 8,
      maxLength: 64,
      blocklist: ["password", "admin"],
    });
    
    // Validate a password
    async function validateWithClass() {
      const result = await validator.validate("mypassword123");
      console.log(result.isValid ? "Valid!" : "Invalid:", result.errors);
    }
    
    // Update configuration as needed
    validator.updateConfig({
      minLength: 12, // This will merge with existing config
      errorLimit: 2,
    });
    
    // Validate again with new config
    validateWithClass();

    The PasswordValidator class provides several benefits:

    • Reusable Configuration: Create a validator instance with your preferred settings
    • Dynamic Updates: Change validation rules on the fly with updateConfig
    • Consistent Validation: Ensure the same rules are applied across multiple password checks
    • Memory Efficient: Reuse the same validator instance instead of creating new configurations

    Methods:

    • constructor(options?: ValidationOptions): Create a new validator with optional initial options
    • validate(password: string): Promise<ValidationResult>: Validate a password using current configuration
    • updateConfig(options: ValidationOptions): void: Update the current configuration by merging new options

    Custom Configuration

    async function checkCustomPassword() {
      const result = await validatePassword("myp@ssw0rd!", {
        minLength: 10, // Custom minimum length (default: 15)
        maxLength: 500000, // Custom maximum length (default: 100K)
        hibpCheck: false, // Disable HIBP check if using local hash database
        blocklist: ["password"], // Custom blocklist
        matchingSensitivity: 0.2, // Custom matching sensitivity (default: 0.25)
        trimWhitespace: true, // Handle leading/trailing whitespace (default: true)
        errorLimit: 3, // Amount of errors to check before stopping (defult: infinty)
      });
    
      if (!result.isValid) {
        console.log("Password validation failed:", result.errors);
      } else {
        console.log("Password is valid!");
      }
    }
    
    checkCustomPassword();

    Error Limit Feature

    The errorLimit option allows users to control how many errors are returned during validation. This helps balance:

    • Performance: Avoid unnecessary checks after reaching the limit.
    • Feedback: Provide detailed insights without overwhelming users.

    Example Usage

    const result = await validatePassword("mypassword", {
      errorLimit: 2, // Report up to 2 errors
    });
    console.log(result.errors); // Returns a maximum of 2 errors
    • Default: Unlimited errors (errorLimit defaults to Infinity).
    • Customizable: Adjust based on user needs or environment constraints.

    Validators

    1. Length Validation

    Ensures the password meets specified length requirements based on Unicode code points.

    import { lengthValidator } from "nist-password-validator";
    
    const result = lengthValidator("mypassword", 8, 64);
    console.log(result.errors);

    2. Blocklist Validation

    Prevents passwords that resemble blocked terms using fuzzy matching.

    import { blocklistValidator } from "nist-password-validator";
    
    const result = blocklistValidator("myp@ssword", ["password"], {
      matchingSensitivity: 0.25,
    });
    console.log(result.errors);

    3. HIBP Validation

    Checks passwords against the Have I Been Pwned breach database.

    import { hibpValidator } from "nist-password-validator";
    
    hibpValidator("mypassword123").then((result) => console.log(result.errors));

    Whitespace Handling

    Handles leading/trailing whitespace in passwords for NIST compliance. Enabled by default.

    // Default: Trims whitespace
    const result1 = await validatePassword("  mypassword  ");
    
    // Disable trimming
    const result2 = await validatePassword("  mypassword  ", {
      trimWhitespace: false,
    });

    Security Considerations

    • Normalize passwords to UTF-8 before hashing.
    • Use local hash databases for HIBP checks in high-security environments.
    • Customize blocklists with sensitive or organization-specific terms.
    • Implement rate limiting for external API calls.

    Contributing

    We welcome contributions! Fork the repo, create a branch, and submit a pull request.


    License

    This library is released under the MIT License.

    Visit original content creator repository
    https://github.com/ypreiser/NIST-password-ts

  • renode-example

    Renode Example

    Simple example of how to use Renode together with Robot Framework to emulate and test firmware on a host PC without the target hardware.

    The project builds for an STM32 NUCLEO-F446RE development board. The default repl (REnode PLatform) file for this board has been modified to include the blue user button functionality. Pressing and releasing this button toggles one of the on-board LEDs.

    Toolchain

    • GNU Arm Embedded Toolchain 10-2020-q4-major
    • GNU Make 4.2.1
    • Renode 1.14.0
    • STM32CubeMX 6.8.1 (for initial project setup only)

    Building the project

    After installing the required packages on your machine (consider using the provided Dockerfile together with the Dev Containers extension for VS Code), you can build the project by running:

    cd nucleo-f446re/ButtonLed
    make

    This should create the compiled binaries under the nucleo-f446re/ButtonLed/build directory.

    Testing with Renode

    After building the binaries, run the following command from the main directory to test for the expected behavior:

    renode-test tests/test-button.robot

    Sample output from GitHub Actions after the test has run successfully:

    test_success

    Visit original content creator repository https://github.com/prdktntwcklr/renode-example
  • serializer-benchmark

    Serializer Benchmark Build Status

    This project aims to compare the performance of some most used and few less known JSON serialization libraries for PHP.

    Inspiration

    This benchmark attempts to compare serialization libraries performance-wise. All of the libraries have their own features, support different formats, added magic and other stuff, but for the sake of simplicity it was decided to simplify sample data to fit all of them.

    The core of benchmarking set was implemented by Tales Santos, the author of TSantos serializer.

    Instalation

    Clone this repository in your workspace

    git clone https://github.com/tsantos84/serializers-benchmarking.git

    Install the application’s dependencies

    Using system installed composer

    composer install -a --no-dev

    or using composer in docker container:

    docker run --rm --interactive --tty -v $(pwd):/app composer install -a --no-dev

    Execution

    The benchmark application can be executed as is with PHP 7.1 and above.

    php vendor/bin/phpbench run --warmup=1 --report=tsantos

    If you don’t have PHP of required version you may use suitable Docker PHP image (PHP 7.1-cli-alpine).

    docker run --rm -it -v $(pwd):/opt -w /opt php:7.1-cli-alpine php vendor/bin/phpbench run --warmup=1 --report=tsantos --group=serialize

    Application parameters

    There’re 2 available benchmark groups:

    • serialize – run serialization benchmark only
    • deserialize – run deserialization benchmark only
    php vendor/bin/phpbench run --warmup=1 --report=tsantos --group=serialize

    Vendors

    It is possible to see all the serializer libraries available in this benchmark and its version:

    php vendor/bin/phpbench vendors

    Benchmark Tool

    This project was written based on PHPBench. Please, refer to its documentation page for further reading about all its runner options.

    Blackfire Integration

    Blackfire is a excelent tool to profile PHP applications and helps you to discover some bottleneck points. This project allows you to run benchmarks and send the call-graph to Blackfire’s server so you can see how each library works internally.

    Installation

    In order to start using Blackfire, you first need to sign up on Blackfire.io and then you’ll have access to your credentials.

    Agent

    Creates a new docker container with the Blackfire’s Agent:

    docker run -d \
      --name="blackfire" \
      -e BLACKFIRE_SERVER_ID={YOUR_BLACKFIRE_SERVER_ID_HERE} \
      -e BLACKFIRE_SERVER_TOKEN={YOUR_BLACKFIRE_SERVER_TOKEN_HERE} \
      blackfire/blackfire

    PHP Executable

    Create a custom PHP image with Blackfire extension installed and enabled:

    cd /path/to/serializer-benchmark
    docker build -t benchmark -f Dockerfile.blackfire .

    Running the application

    Now you can run the application using the PHP image create on step before:

    docker run \
      --rm \
      -it \
      -v $(pwd):/opt \
      -w /opt \
      -e BLACKFIRE_CLIENT_ID={YOUR_BLACKFIRE_CLIENT_ID_HERE} \
      -e BLACKFIRE_CLIENT_TOKEN={YOUR_BLACKFIRE_CLIENT_TOKEN_HERE} \
      --link blackfire:blackfire \
      benchmark php vendor/bin/phpbench run --warmup=1 --report=tsantos --group=serialize --executor=blackfire

    Docker Compose

    Instead of running each container manually, you can use docker-compose to run the benchmarks. To accomplish this you need to create a copy of the docker-compose.yaml.dist file:

    cp docker-compose.yml.dist docker-compose.yml

    and run one of the following commands:

    # perform serialization benchmark
    docker-compose run --rm bench_serialize
    
    # perform deserialization benchmark
    docker-compose run --rm bench_deserialize
    
    # perform serialization benchmark with Blackfire enabled
    docker-compose run --rm bench_serialize_blackfire \
        -e BLACKFIRE_SERVER_ID={YOUR_BLACKFIRE_SERVER_ID} \
        -e BLACKFIRE_SERVER_TOKEN={YOUR_BLACKFIRE_SERVER_TOKEN} \
        -e BLACKFIRE_CLIENT_ID={YOUR_BLACKFIRE_CLIENT_ID} \
        -e BLACKFIRE_CLIENT_TOKEN={YOU_BLACKFIRE_CLIENT_TOKEN}
    
    # perform deserialization benchmark with Blackfire enabled
    docker-compose run --rm bench_deserialize_blackfire \
        -e BLACKFIRE_SERVER_ID={YOUR_BLACKFIRE_SERVER_ID} \
        -e BLACKFIRE_SERVER_TOKEN={YOUR_BLACKFIRE_SERVER_TOKEN} \
        -e BLACKFIRE_CLIENT_ID={YOUR_BLACKFIRE_CLIENT_ID} \
        -e BLACKFIRE_CLIENT_TOKEN={YOU_BLACKFIRE_CLIENT_TOKEN}

    As you have your own copy of the docker-compose.yml file, you can define those environment variables there and save time when run the benchmarks with Blackfire enabled.

    Note

    By running the benchmark with Blackfire enabled you’ll realize that the mean time will increase substantially. This behavior is expected because the Blackfire needs to introspect in your code and hence affects the benchmark metrics.

    Contribution

    Want to see more libraries in this benchmark? You can easily add new benchmarks by implementing the BenchInterface interface or extending the AbstractBench class which has a lot of help methods. Please, take a look at some of existing bench classes and you’ll see how you can write your own benchmark.

    Visit original content creator repository https://github.com/tsantos84/serializer-benchmark
  • update-dynamodb-glue

    Update DynamoDB with AWS Glue

    This is a sample project to demonstrate how to update DynamoDB with AWS Glue. On this table there are no one pokemon category, so we need to filter the data and update each row with the correct category from the pokemon API.

    number name
    1 Bulbasaur
    2 Ivysaur
    3 Venusaur
    4 Charmander
    5 Charmeleon
    6 Charizard

    How to run

    1. Create a DynamoDB table

    Create a DynamoDB table with the following schema.

    field description
    number The pokemon number
    name The pokemon name

    2. Create Role

    Create a role with the following permissions to access DynamoDB and S3.

    {
        "Version": "2012-10-17",
        "Statement": [
            {
                "Effect": "Allow",
                "Principal": {
                    "Service": "glue.amazonaws.com"
                },
                "Action": "sts:AssumeRole"
            }
        ]
    }

    Add policies:

    • DynamoDBFullAccess
    • S3FullAccess

    3. Create a Glue job

    Create a Glue job with the following settings.

    • Job type: Spark
    • Job language: Python
    • Glue version: 3.0
    • Number of workers: 2

    4. Run the Glue job on AWS Console

    5. Check the DynamoDB table

    You can see the following records in the DynamoDB table.

    number name category
    1 Bulbasaur grass
    2 Ivysaur grass
    3 Venusaur grass
    4 Charmander fire
    5 Charmeleon fire
    6 Charizard fire

    References


    Developed by Jean Jacques Barros

    Visit original content creator repository
    https://github.com/jjeanjacques10/update-dynamodb-glue

  • ansible-digitalocean-sample-playbook

    Sample Ansible Playbook to provision a DigitalOcean droplet

    Build Status

    This is a sample playbook that illustrates how to create and provision a DigitalOcean droplet with Ansible; you can spin up and provision a droplet using the command line via this playbook.

    Playbook Demo Image

    This playbook does the following:

    • Spins up a DigitalOcean droplet
    • Adds the droplet’s IP address to the ansible inventory file
    • Setup the swap file
    • Installs and setup fail2ban
    • Setup Uncomplicated firewall
    • Setup the timezone
    • Adds a new user account with sudo access
    • Adds a public ssh key for the new user account
    • Disables password authentication to the droplet
    • Deny root login to the droplet
    • Installs the UnattendedUpgrades package for automatic security updates
    • (Optional) Installs the LEMP stack
    • (Optional) Installs Docker

    Prerequisites

    Ansible >= 2.4.0.0

    Usage

    1. Clone this repo:
    git clone https://github.com/jasonheecs/ansible-digitalocean-sample-playbooks.git
    cd ansible-digitalocean-sample-playbooks
    
    1. Rename the group_vars/all/secret.yml.example file to group_vars/all/secret.yml and change the secret variables to your appropriate values.

    2. Modify the values in group_vars/all/main.yml with your desired values.

    3. Run the following:

    ansible-galaxy install -r requirements.yml
    ansible-playbook -i hosts main.yml
    

    Testing

    Testing is done via Kitchen CI and Kitchen Ansible. Testing of the droplet setup is done via Kitchen Vagrant:

    gem install bundler
    bundle install
    bundle exec kitchen test
    

    Testing of the LEMP stack and Docker installation / setup is done via Kitchen Docker:

    gem install bundler
    bundle install
    KITCHEN_YAML=".kitchen.travis.yml" bundle exec kitchen test
    

    Refer to the travis.yml file and Travis build logs for details on the test build process and expected outputs.

    License

    MIT

    Visit original content creator repository https://github.com/jasonheecs/ansible-digitalocean-sample-playbook
  • POWER_BI_Evaluer_la_strategie_de_marketing_digital

    Évaluer l’éfficacité de la strategie de marketing digital

    Il s’agit d’un projet libre pour lequel j’ai sélectionné un dataset sur Kaggle

    marketing

    Contexte :

    TheLook est une entreprise (fictive) américaine créée en 2019, spécialisée dans la vente de vêtements pour femme, homme et enfant. Sa stratégie de communication repose principalement sur une stratégie de marketing digitale, en diffusant des campagnes marketing via différentes sources de trafic afin de promouvoir ses services et ses produits.
    Dans un marché en constante évolution et fortement concurrencé, l’entreprise souhaite à présent évaluer l’éfficacité de la stratégie de communication afin de surveiller les progrès et éventuellemnt ajuster la stratégie de communication en conséquence afin de maximiser le retour sur investissement

    Objectifs :

    Les objectifs de ce projets sont :

    • Analyser les performances de ventes (nombre d’inscriptions, nombre de commandes, nombre de clients, CA total, taux de rétention, ainsi que leurs évolutions)
    • Analyser les performances marketing (sources de trafic utilisés et proportion, nombre d’impressions, taux de clics et nombre de clics par type d’évenement, taux de conversion, CA généré par canal)
    • Segmentation client : mieux comprendre le profil des clients (provenance et préférences d’achat)

    Tâches :

    Les réalisations éffectuées sont :

    • Élaboration d’un mock up et blueprint pour mieux structurer et concevoir le rapport
    • Modelisation : créer des relations entre les différentes tables
    • Création de graphiques variés afin de synthétiser visuellement les analyses
    • Création de calculs à l’aide du language DAX afin de collécter des informations pertinentes

    Résultats :

    Ce que j’ai appris :

    • Création d’un dashboard contenant différents graphiques mis en forme pour synthétiser visuellement les données
    • Réaliser des calculs DAX simples et complexes pour répondre aux besoins
    • Mise en forme du rapport pour une visualisation et navigation agréable
    • Utiliser le storytelling pour communiquer les résultats analysés
    • Recommadations pour optimiser la stratégie de communication digitale
    Visit original content creator repository https://github.com/SabrinaN58/POWER_BI_Evaluer_la_strategie_de_marketing_digital
  • apps-static

    apps-static

    Standalone portable applications

    Static applications, portable across all Linuxes. Builds for x86, x86-64, armhf and arm64.

    Purpose

    • No root permissions needed

    • Using the latest release of an application

    • Don’t potentially mess up your system – no dependencies

    • Portable across all Linuxes

    Get the application

    You can use the helper.sh script that will download the package in the actual directory.

    wget -qO- can be replaced by curl -s

    To list available packages:

    wget -qO- https://raw.githubusercontent.com/DFabric/apps-static/master/helper.sh

    Change ${PACKAGE} by your chosen package.

    To download the ${PACKAGE} in the current directory:

    sh -c "APP=${PACKAGE} $(wget -qO- https://raw.githubusercontent.com/DFabric/apps-static/master/helper.sh)"

    You can place its subdirectories (e.g. bin, lib, share…) in /usr/local/ to be reachable globally, or directly use the binnary in bin.

    Manual download

    Simply download and extract the archive of the application. The path can be /usr or whatever you want.

    Replace ${PACKAGE} by one of the available here

    wget -qO- ${URL_PATH} | tar xJf -

    A $PACKAGE folder will be created.

    The binaries you will need are likely to be in the bin folder, but other locations like sbin depending of the application/library.

    Building

    You will need to have Docker installed. An Alpine Linux image is used for the build environment.

    To build a package:

    ./build-static PACKAGE ARCHITECTURES...

    For example:

    ./build-static dppm-static x86-64,arm64,armhf

    The sources used for the builds are available in the source directory.

    Each program/library have its own pkg.yml description file that have:

    • the source dependencies (already builded with this tool)
    • the Alpine Linux dependencies
    • the latest version of it (regex + url)

    The build-static.sh list the commands to build the package

    Additional files can also be found depending of the needs.

    The builds are reproducible and their hashes are stored in SHA512SUMS.

    Disclaimers

    Features and modules can be missing and/or not functioning like expected.

    The applications aren’t specially developed to become static and portable, this is not for the moment very well tested.

    This project is designed to be easily ported to support BSD, Darwin, NT kernels and to be used without Docker.

    License

    Copyright (c) 2017-2018 Julien Reichardt – ISC License

    Visit original content creator repository
    https://github.com/DFabric/apps-static