This is a simple mock containerization tool written in Go. It mimics the behavior of basic container operations like pulling an image, unpacking it, and running commands within a new namespace. This tool does not fully replicate Docker’s functionality but provides a lightweight alternative for educational purposes.
Features
Pull Docker images and save them as tar.gz archives.
Unpack the archives and run commands within new namespaces.
Use cgroups to limit resources.
Chroot to the unpacked image root filesystem.
Usage
Commands
run: Run a command inside a new container.
./cnts run <image><command>
Example:
./cnts run ubuntu /bin/sh
child: This is an internal command used by run. It sets up the new namespaces and executes the command.
pull: Pull a Docker image and store it as a tar.gz archive.
./cnts pull <image>
Example:
./cnts pull ubuntu
Pull Script
The pull script is a helper bash script to fetch Docker images, export their filesystem, and save it to the assets directory.
root@device:~# ./cnts run <image> <command>
root@device:~# ./cnts pull <image>
Note
This tool is for educational purposes and is not intended for production use. It demonstrates basic containerization concepts like namespaces and cgroups without the complexity and features of full-fledged container runtimes like Docker.
This repository is divided into repositories 1a, 1b, 2 and 3. Through this project a glassfish application that connects to a postgres sql database and that it is deployed through different linux machines will be developed and its performance meausured, tested and improved.
Throug repository 1a I start getting in touch with elements of the JAVA EE architecture, to a multitier system(GUI, application and RDBMs). The application developed uses JSP, Servlets and JavaBeans. It is also used JDBC to connect to the database. In this first repository I also work throught the technology of Web Services and automatitation of work and deploy with ant.
Through repository1b I keep understanding the insights of the JAVA EE architecture. I work through the business logic through EJBs session stateless. I also work through queue manager and API JMS for the communication between JAVA EE applications. Also I work through the Message Driven Beans(MDBs).
Through repository 2, the performace of the JAVA EE application is measured. I work through aspects of performance in JAVA EE applications, influence of the configuration of the server of applications in the performance, processing chain within the application server, elements that compose it, glue points, obtaining the productivity curve, application server configuration for performance, performance evaluation mechanisms and unit tests and stress tests of a JAVA EE application: automation of a test plan with the JMETER tool.
Through repository 3, it is reviewed general aspects of clustering, configuration of a cluster, implementation of a secure cluster and availability tests of a J2EE application.
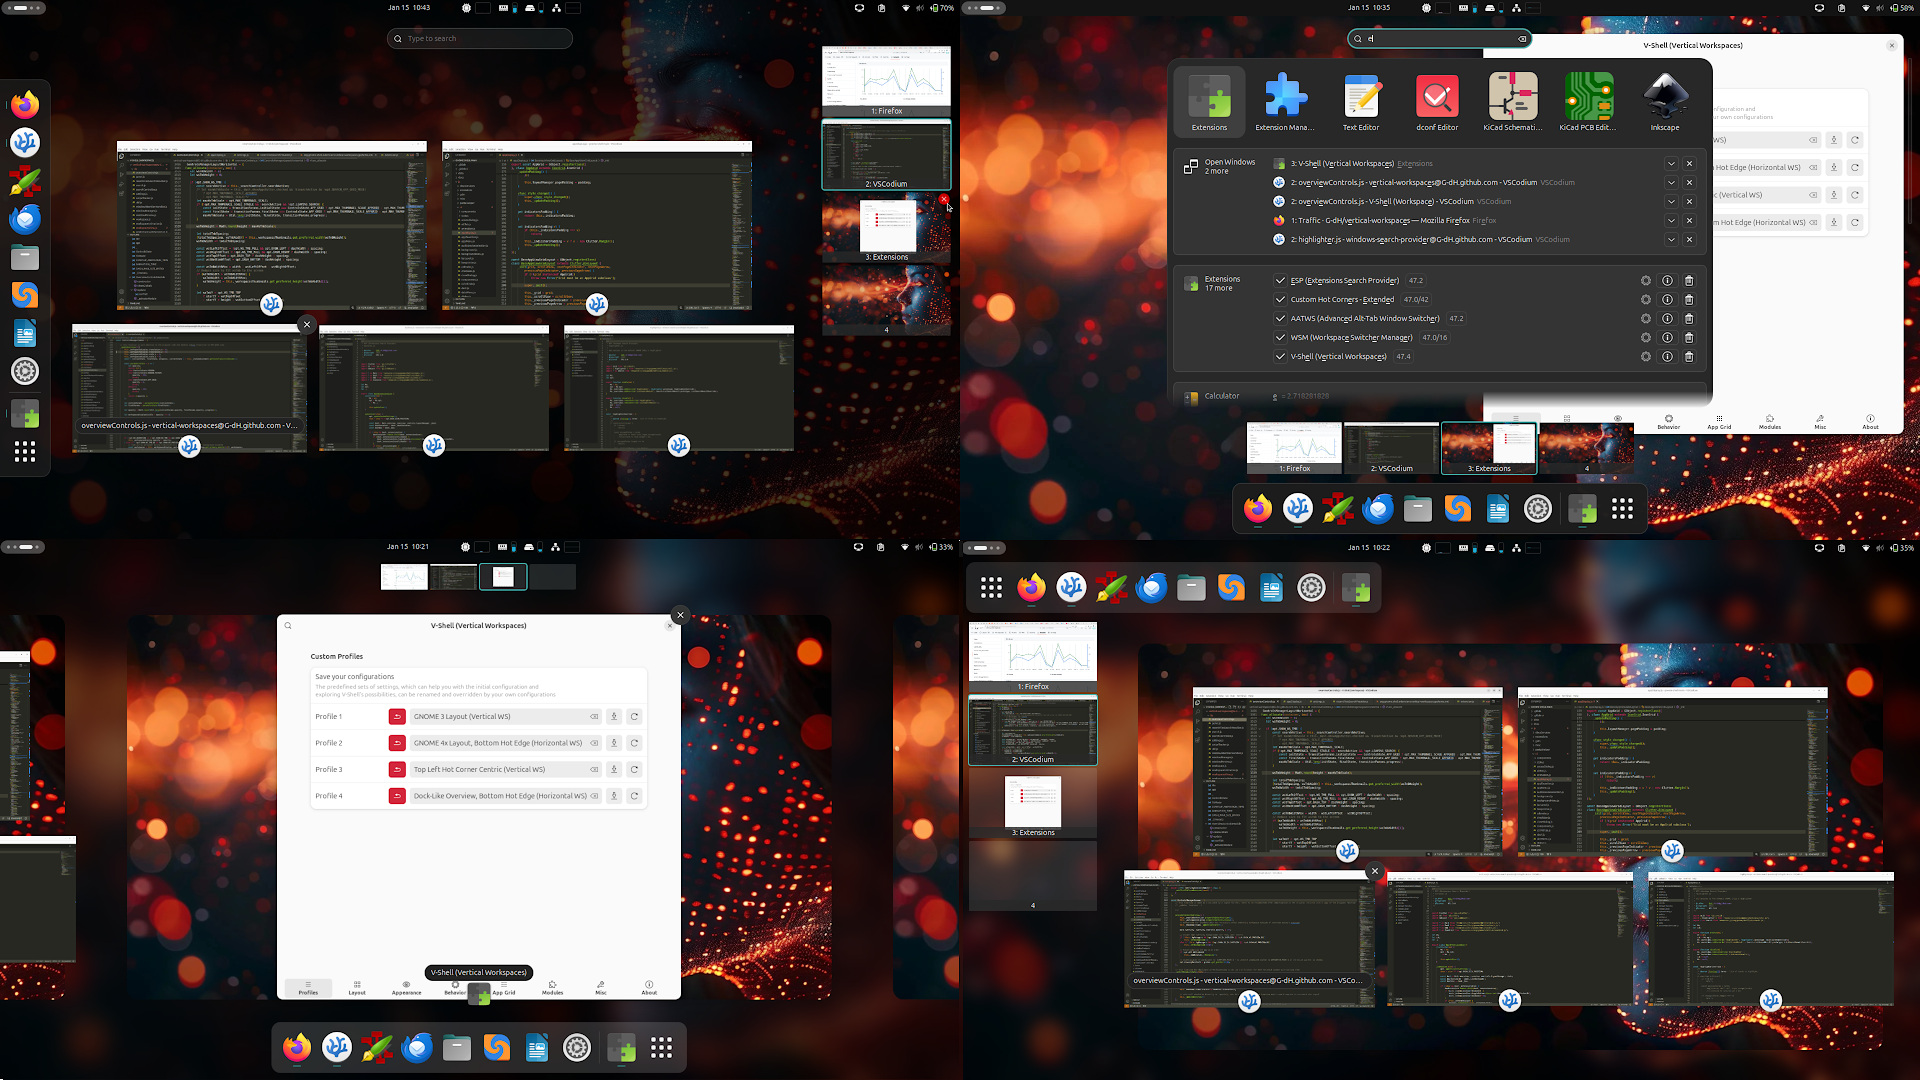
A GNOME Shell extension that lets you customize and enhance your GNOME Shell UX to suit your workflow, whether you like horizontally or vertically stacked workspaces.
Currently supported GNOME versions: 42 – 48.
The main branch, which always contains the most recent version, supports GNOME 45–48. New features and optimizations are backported to the gnome-42-44 branch with a delay.
Features
Supports both vertically and horizontally stacked workspaces
Customizable overview layout, appearance and behavior
Customizable secondary monitor overview
Enhanced overview keyboard navigation and control supporting secondary monitors
Static overview modes minimize unnecessary screen content movement
Optional hot corner/edge position
Customizable panel visibility
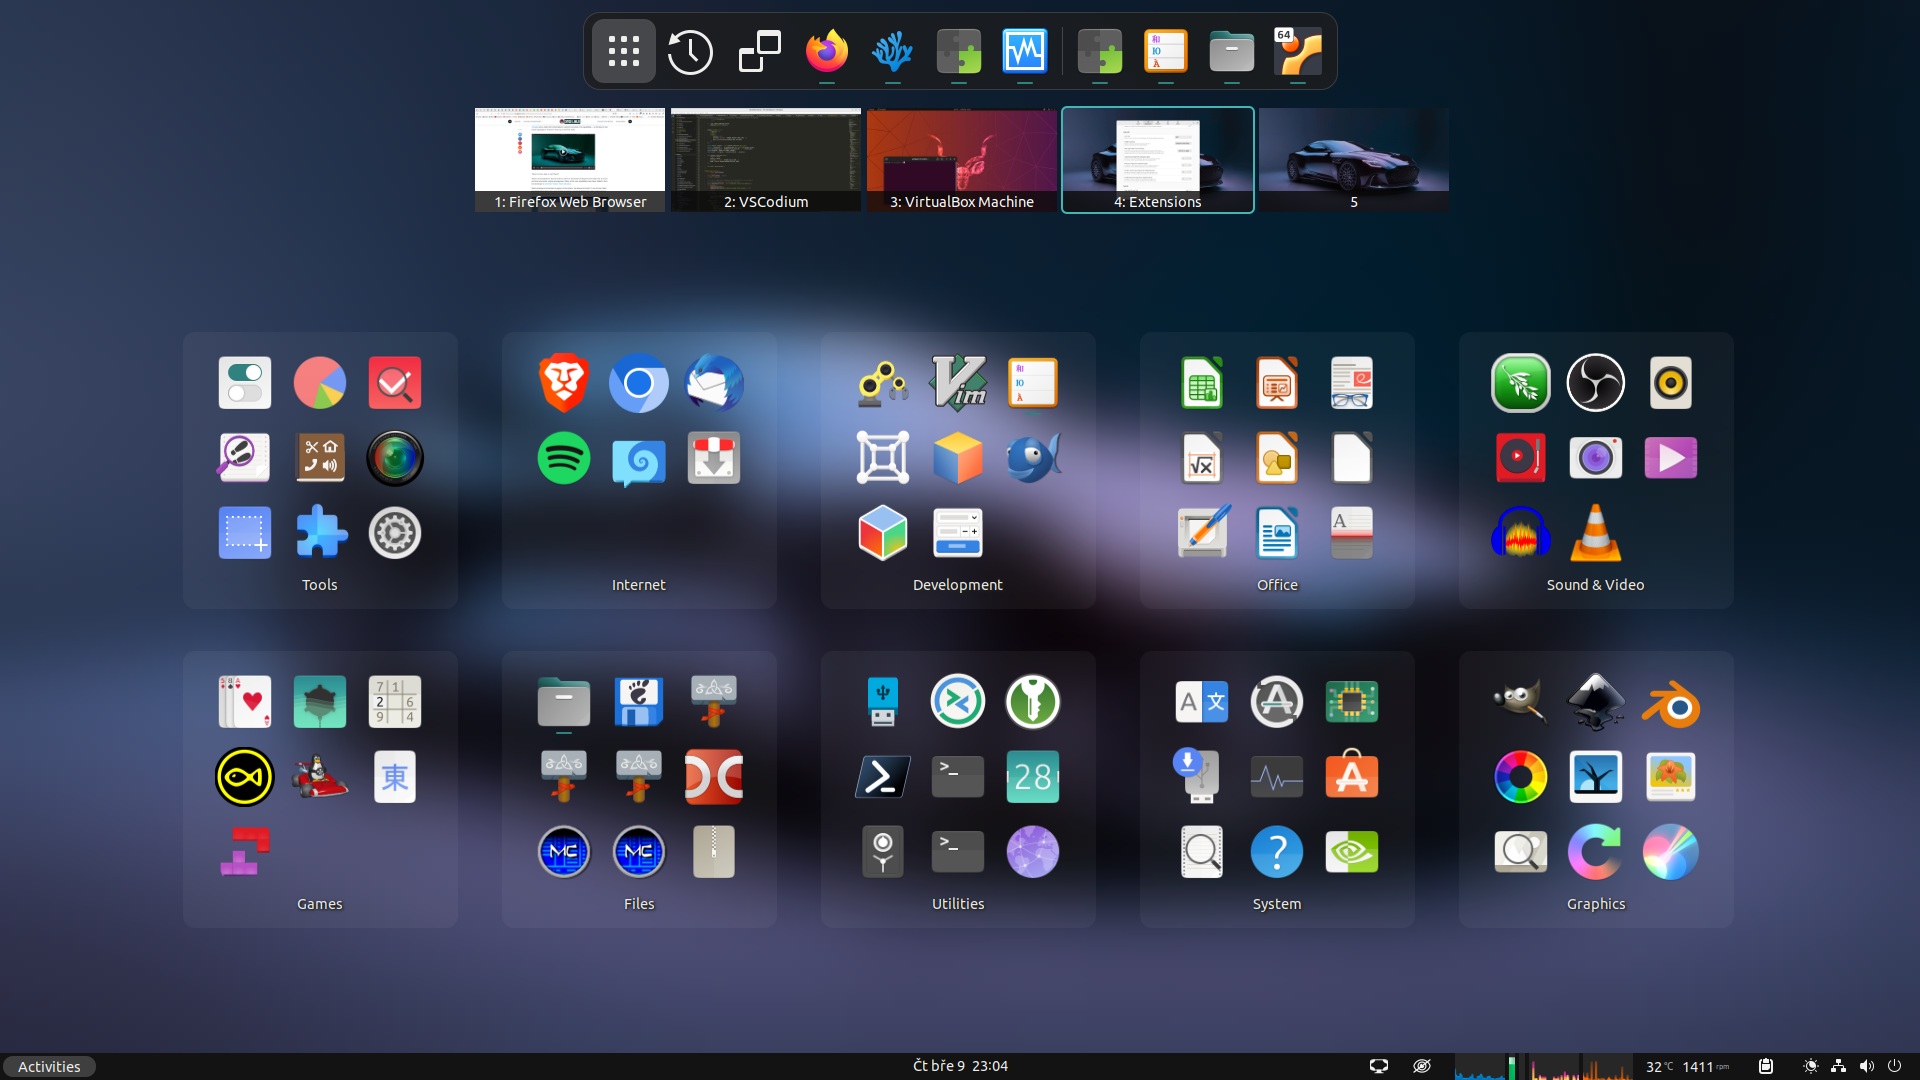
Customizable app grid and app folders – icon size, dimensions, sorting, active folder previews
Customizable dash – icon size, appearance and behavior, workspace isolation, click and scroll actions
Customizable search – results width, number of results, improved searching
Keyboard and mouse shortcuts allow advanced workspace and window control
4 predefined and fully customizable profiles
Added functionality
This section explains some of the less obvious and invisible additions to the Shell’s behavior.
Activities overview
Right click on Activities button (now also workspace indicator) opens App Grid
If you’re using a mouse, you can open the app grid directly by clicking the Activities button with the secondary mouse button.
Hot corner
V-Shell lets you choose which corner opens the Activities overview. You can also make the whole edge of the screen work as a trigger. This can be set in Hot Corner > Position on the Behavior tab of the Settings window. The Follow Dash option picks the corner closest to the first icon in the Dash. The Follow Dash - Hot Edge option makes the whole screen edge where the Dash is active. Be aware that the hot edge may block the mouse pointer from accessing the secondary monitor.
Keyboard and mouse shortcuts in the window picker view
V-Shell fixes the Tab key navigation and adds more hotkeys to control windows and workspaces
Hotkey
Description
Tab
Select next window on the current workspace. Shift reverses direction
Super + Tab
Cycle keyboard focus between monitors on multi-monitor system, or between workspaces if only one monitor is connected
Ctrl + Tab
Switch to next workspace with wrap-around functionality
Alt + Tab
Switch keyboard focus to the first icon on the Dash
Shift + click (activate) app icon
Move all windows of the application to the current workspace. Works in Dash, Search and App Grid, you can use mouse click or Enter and Space keys to activate the icon
Shift + Page Up/Down, Shift + Scroll
Reorder current workspace
Shift + Enter
Move selected window to the next monitor
Ctrl + Shift + Enter
Move all windows of the selected app on the current monitor to the next monitor
Ctrl + Super + Arrow
Move window to the adjecent monitor in the Arrow key direction
Del
Close selected window
Ctrl + Shift + Del
Close all windows on the current workspace and monitor
Shift + Ctrl + Space
Open V-Shell Settings window
Space
Activate window search with all open windows if WSP (Window Search Provider) extension is installed and enabled
Ctrl + Space
Activate extensions search with all installed extensions if ESP (Extensions Search Provider) extension is installed and enabled
New buttons
Button
Description
Close button in workspace thumbnail
Close all windows on the workspace. Default configuration requires double-click
Trash button in app folder
Remove folder – move all icons to the main grid. Default configuration requires double-click
Search improvements
V-Shell enhances the default app search by adding categories and executables from app launchers to the search sources, while prioritizing app names.
App results can include GNOME Settings
V-Shell provides an option to include GNOME Settings panels in the app results, making them more quickly accessible than through the separate list box.
Type two dots to isolate system functions
You can use two dots (..) before a search query to isolate system functions included in the app search results – for example, type ..log, ..out, or even ..g to access the logout dialog. Or type the dots and select the desired function using tha Tab key or arrow keys.
Move application windows to the current workspace
If you activate an app icon while holding the Shift key, all of its windows will be moved to the current workspace. This works also for Dash icons.
App Grid
Type to filter app grid
The default V-Shell configuration features a searchable app grid, allowing you to filter its content, including app folders, simply by typing when the app grid view is active. It delivers the same results as the default app search but without the constraint of the search view width. Additionally, V-Shell can search for apps by categories embedded in their launchers, making it easy to find all system, game, internet, or video applications. This functionality minimizes the need for manually organizing apps into visual categories.
Active icons in app folder previews
To enhance the efficiency of the application menu when using the mouse, V-Shell offers the Active Icons in Folder Preview option. When enabled, icons in the folder preview (folder icon) behave like regular app icons, allowing users to interact with them without opening the folder. V-Shell allows you to increase the number of icons in the preview from 4 to 9, as well as adjust the size of the app grid icons. This feature enables the folder icons to divide the main app grid into sections, with the most frequently used apps readily accessible while others remain hidden deeper within folders.
Open all apps in the folder at once
Simply drag-and-drop folder onto a workspace thumbnail to open all containing applications.
Known issues
Workspace navigation shortcuts
The default GNOME Shell configuration includes predefined shortcuts for workspaces oriented in both axis:
(Shift)+Ctrl+Alt+ Arrow Keys
and for horizontal only:
(Shift)+Super+PageUp/Down
The default GNOME Settings application only offers options to configure keyboard shortcuts for horizontally oriented workspaces. However, the gSettings configuration scheme provides keys for shortcuts for vertically oriented workspaces as well. You can access and configure these shortcuts using the dconf Editor.
When V-Shell is configured to use vertically stacked workspaces, the (Shift)+Super+PageUp/Down shortcuts for switching workspaces stop working.
V-Shell provides the option Override Page Up/Down Shortcuts to automatically switch the default Super+PageUp/Down and Shift+Super+PageUp/Down shortcuts for the current workspace orientation. If enabled, this option will move the shortcuts between following gSettings keys:
Horizontal orientation
Vertical orientation
switch-to-workspace-left
switch-to-workspace-up
switch-to-workspace-right
switch-to-workspace-down
move-to-workspace-left
move-to-workspace-up
move-to-workspace-right
move-to-workspace-down
Note that unlike the GNOME Settings application, dconf Editor allows you to add more than one keyboard shortcut to each action. V-Shell preserves all other shortcuts, only moves following strings between related gSetting keys:
<Super>Page_Up
<Super>Page_Down
<Super><Shift>Page_Up
<Super><Shift>Page_Down
The key order follows the order in which GNOME Settings stores the shortcuts. If you add the same shortcut but with a different key order, V-Shell will not recognize it, and you might end up with the same shortcut assigned to two actions.
Compatibility with other extensions
V-Shell overrides parts of the GNOME Shell’s UI code, and many extensions do the same, so conflicts are inevitable. V-Shell tries to mitigate the consequences of conflicts with the most popular extensions, which includes disabling its own modules. This means that some of V-Shell’s settings may not function when conflicting extensions are enabled. V-Shell also provides manual control over its modules so the user can disable problematic ones if needed.
Please, report any incompatibility, you encounter while using V-Shell.
V-Shell modules automatically disabled when conflicting extensions are detected
Module
Extensions causing module to disable
Dash
Dash to Dock, Ubuntu Dock, Dash to Panel, Dash2Dock Animated
Panel
Dash to Panel, Hide Top Bar
Layout
Dash to Panel, CHC-E,
WorkspaceSwitcherPopup
WSM (Workspace Switcher Manager)
Extensions causing V-Shell to automatically delay its activation
to prevent crashes upon GNOME Shell starting up:
Dash to Dock
Ubuntu Dock
Dash to Panel
Dash2Dock Animated
You can enable this option manually if needed, using the Delay at Startup option on the Misc tab of the Settings window.
Extensions whose functionality is included in V-Shell
and should be disabled or restricted by the user:
Partially Blur My Shell – V-Shell provides a basic settings for the overview background, including brightness and blur effects. If you want to use Blur My Shell, consider disabling its options for the overview, including app folders, to prevent visual glitches and inconsistency during transitions between overview states.
Alphabetical App Grid – V-Shell provides much more options than alphabetical sorting
Grand Theft Focus and other extensions preventing showing notification instead of immediately focusing the window that demands attention
Hot Edge – V-Shell provides this functionality as an option of the Hot Corner Position setting
Some of the Just Perfection options including overview elements visibility and size, notifications/OSD positions, hiding main panel, animation speed, and more
Impatience and extensions adjusting animation speed
Click to close overview – V-Shell provides the Click Empty Space To Close option
Changelog
See what’s changed in recent versions
CHANGELOG.md
Installation
Installation from extensions.gnome.org
The easiest way to install the latest stable release of V-Shell: go to extensions.gnome.org and toggle the switch.
Installation from the latest Github release
Download the latest release archive using following command:
The most recent version in the repository is the one I’m currently using and developing on my own systems, problems may occur, but usually nothing serious. The repository version may change often and doesn’t updates automatically on your system. If you want to help me, use this latest version and report bugs.
You may need to install git, make, gettext and glib2.0 for successful installation.
Navigate to the directory you want to download the source code and execute following commands in the terminal:
GNOME 45+:
git clone https://github.com/G-dH/vertical-workspaces.git
cd vertical-workspaces
make install
GNOME 42 – 44:
git clone https://github.com/G-dH/vertical-workspaces.git
cd vertical-workspaces
git checkout gnome-42-44
make install
If you get Can't recursively copy directory error, take a look at issue #51.
Enabling the extension
After installation you need to enable the extension and access its settings.
First restart GNOME Shell (ALt + F2, r, Enter, or Log Out/Log In if you use Wayland)
Now you should see Vertical Workspaces extension in Extensions application (re-open the app if needed to load new data), where you can enable it and access its Preferences window by pressing Settings button.
Credits
V-Shell contains modified GNOME Shell source code and was originally based on parts of Vertical Overview extension.
Contribution
If you want to help with V-Shell development, please provide feedback, whether it’s positive, negative, a bug report, or a feature request. Even if I don’t agree with you, it can help improve V-Shell.
Donations
If you enjoy using my extensions, you can help me with my coffee expenses:
Any support is greatly appreciated!
License
This program is distributed under the terms of the GNU General Public License, version 3 or later. See LICENSE file for details.
Rails is a web-application framework that includes everything needed to create database-backed web applications according to the Model-View-Control pattern.
This pattern splits the view (also called the presentation) into “dumb” templates that are primarily responsible for inserting pre-built data in between HTML tags. The model contains the “smart” domain objects (such as Account, Product, Person, Post) that holds all the business logic and knows how to persist themselves to a database. The controller handles the incoming requests (such as Save New Account, Update Product, Show Post) by manipulating the model and directing data to the view.
In Rails, the model is handled by what’s called an object-relational mapping layer entitled Active Record. This layer allows you to present the data from database rows as objects and embellish these data objects with business logic methods. You can read more about Active Record in files/vendor/rails/activerecord/README.html.
The controller and view are handled by the Action Pack, which handles both layers by its two parts: Action View and Action Controller. These two layers are bundled in a single package due to their heavy interdependence. This is unlike the relationship between the Active Record and Action Pack that is much more separate. Each of these packages can be used independently outside of Rails. You can read more about Action Pack in files/vendor/rails/actionpack/README.html.
Sometimes your application goes wrong. Fortunately there are a lot of tools that will help you debug it and get it back on the rails.
First area to check is the application log files. Have “tail -f” commands running on the server.log and development.log. Rails will automatically display debugging and runtime information to these files. Debugging info will also be shown in the browser on requests from 127.0.0.1.
You can also log your own messages directly into the log file from your code using the Ruby logger class from inside your controllers. Example:
classWeblogController<ActionController::Basedefdestroy@weblog = Weblog.find(params[:id])
@weblog.destroylogger.info("#{Time.now} Destroyed Weblog ID ##{@weblog.id}!")
endend
The result will be a message in your log file along the lines of:
Mon Oct 08 14:22:29 +1000 2007 Destroyed Weblog ID #1!
Debugger support is available through the debugger command when you start your Mongrel or WEBrick server with –debugger. This means that you can break out of execution at any point in the code, investigate and change the model, and then, resume execution! You need to install ruby-debug to run the server in debugging mode. With gems, use sudo gem install ruby-debug. Example:
The console is a Ruby shell, which allows you to interact with your application’s domain model. Here you’ll have all parts of the application configured, just like it is when the application is running. You can inspect domain models, change values, and save to the database. Starting the script without arguments will launch it in the development environment.
To start the console, run rails console from the application directory.
Options:
Passing the -s, --sandbox argument will rollback any modifications made to the database.
Passing an environment name as an argument will load the corresponding environment. Example: rails console production.
To reload your controllers and models after launching the console run reload!
You can go to the command line of your database directly through rails dbconsole. You would be connected to the database with the credentials defined in database.yml. Starting the script without arguments will connect you to the development database. Passing an argument will connect you to a different database, like rails dbconsole production. Currently works for MySQL, PostgreSQL and SQLite 3.
Holds all the code that's specific to this particular application.
app/assets
Contains subdirectories for images, stylesheets, and JavaScript files.
app/controllers
Holds controllers that should be named like weblogs_controller.rb for
automated URL mapping. All controllers should descend from
ApplicationController which itself descends from ActionController::Base.
app/models
Holds models that should be named like post.rb. Models descend from
ActiveRecord::Base by default.
app/views
Holds the template files for the view that should be named like
weblogs/index.html.erb for the WeblogsController#index action. All views use
eRuby syntax by default.
app/views/layouts
Holds the template files for layouts to be used with views. This models the
common header/footer method of wrapping views. In your views, define a layout
using the <tt>layout :default</tt> and create a file named default.html.erb.
Inside default.html.erb, call <% yield %> to render the view using this
layout.
app/helpers
Holds view helpers that should be named like weblogs_helper.rb. These are
generated for you automatically when using generators for controllers.
Helpers can be used to wrap functionality for your views into methods.
config
Configuration files for the Rails environment, the routing map, the database,
and other dependencies.
db
Contains the database schema in schema.rb. db/migrate contains all the
sequence of Migrations for your schema.
doc
This directory is where your application documentation will be stored when
generated using <tt>rake doc:app</tt>
lib
Application specific libraries. Basically, any kind of custom code that
doesn't belong under controllers, models, or helpers. This directory is in
the load path.
public
The directory available for the web server. Also contains the dispatchers and the
default HTML files. This should be set as the DOCUMENT_ROOT of your web
server.
script
Helper scripts for automation and generation.
test
Unit and functional tests along with fixtures. When using the rails generate
command, template test files will be generated for you and placed in this
directory.
vendor
External libraries that the application depends on. Also includes the plugins
subdirectory. If the app has frozen rails, those gems also go here, under
vendor/rails/. This directory is in the load path.
erdantic is a simple tool for drawing entity relationship diagrams (ERDs) for Python data model classes. Diagrams are rendered using the Graphviz library. Supported data modeling frameworks are:
You can use erdantic either as a convenient CLI or as a Python library. Great for adding a simple and clean data model reference to your documentation.
Type annotations are formatted using the typenames library.
Installation
erdantic’s graph modeling depends on pygraphviz and Graphviz, an open-source C library. If you are on Linux or macOS, the easiest way to install everything together is to use conda and conda-forge:
conda install erdantic -c conda-forge
If not using conda, Graphviz must be installed first (before you can install pygraphviz). For recommended options and installation troubleshooting, see the pygraphviz docs. Then to install erdantic and its Python dependencies from PyPI:
pip install erdantic
Development version
You can get the development version from GitHub with:
First, make sure that the data model classes that you want to include in your diagram are importable. This means the code with your models should either be available on your sys.path or installed into the same virtual environment as erdantic.
The fastest way to produce a diagram like the above example is to use the erdantic CLI. Simply specify the full dotted import path to your model and an output file path. The rendered format is interpreted from the filename extension.
You can also import the erdantic Python library. This lets you inspect the diagram data and potentially modify it. You will have greater ability to customize the diagram in Python.
importerdanticaserdfromerdantic.examples.pydanticimportParty# Easy one-linererd.draw(Party, out="diagram.png")
# Or create a diagram object that you can inspect and do stuff withdiagram=erd.create(Party)
list(diagram.models.keys())
#> [ 'erdantic.examples.pydantic.Adventurer',#> 'erdantic.examples.pydantic.Party',#> 'erdantic.examples.pydantic.Quest',#> 'erdantic.examples.pydantic.QuestGiver']diagram.draw("diagram.png")
Check out the “Usage Examples” section of our docs to see more.
 *   Clojure
 *   Copyright (c) Rich Hickey. All rights reserved.
 *   The use and distribution terms for this software are covered by the
 *   Eclipse Public License 1.0 (http://opensource.org/licenses/eclipse-1.0.php)
 *   which can be found in the file epl-v10.html at the root of this distribution.
 *   By using this software in any fashion, you are agreeing to be bound by
 * 	 the terms of this license.
 *   You must not remove this notice, or any other, from this software.

Docs: http://clojure.org
Feedback: http://groups.google.com/group/clojure
Getting Started: http://dev.clojure.org/display/doc/Getting+Started

To run:  java -cp clojure-${VERSION}.jar clojure.main

To build locally with Ant:

   One-time setup:    ./antsetup.sh
   To build:          ant

Maven 2 build instructions:

  To build:  mvn package
  The built JARs will be in target/

  To build without testing:  mvn package -Dmaven.test.skip=true

  To build and install in local Maven repository:  mvn install

  To build a ZIP distribution:  mvn package -Pdistribution
  The built .zip will be in target/


--------------------------------------------------------------------------
This program uses the ASM bytecode engineering library which is distributed
with the following notice:

Copyright (c) 2000-2005 INRIA, France Telecom
All rights reserved.

Redistribution and use in source and binary forms, with or without
modification, are permitted provided that the following conditions
are met:

1. Redistributions of source code must retain the above copyright
   notice, this list of conditions and the following disclaimer.

2. Redistributions in binary form must reproduce the above copyright
   notice, this list of conditions and the following disclaimer in the
   documentation and/or other materials provided with the distribution.

3. Neither the name of the copyright holders nor the names of its
   contributors may be used to endorse or promote products derived from
   this software without specific prior written permission.

THIS SOFTWARE IS PROVIDED BY THE COPYRIGHT HOLDERS AND CONTRIBUTORS "AS IS"
AND ANY EXPRESS OR IMPLIED WARRANTIES, INCLUDING, BUT NOT LIMITED TO, THE
IMPLIED WARRANTIES OF MERCHANTABILITY AND FITNESS FOR A PARTICULAR PURPOSE
ARE DISCLAIMED. IN NO EVENT SHALL THE COPYRIGHT OWNER OR CONTRIBUTORS BE
LIABLE FOR ANY DIRECT, INDIRECT, INCIDENTAL, SPECIAL, EXEMPLARY, OR
CONSEQUENTIAL DAMAGES (INCLUDING, BUT NOT LIMITED TO, PROCUREMENT OF
SUBSTITUTE GOODS OR SERVICES; LOSS OF USE, DATA, OR PROFITS; OR BUSINESS
INTERRUPTION) HOWEVER CAUSED AND ON ANY THEORY OF LIABILITY, WHETHER IN
CONTRACT, STRICT LIABILITY, OR TORT (INCLUDING NEGLIGENCE OR OTHERWISE)
ARISING IN ANY WAY OUT OF THE USE OF THIS SOFTWARE, EVEN IF ADVISED OF
THE POSSIBILITY OF SUCH DAMAGE.


-------------------------------------------------------------------------
This program uses the Guava Murmur3 hash implementation which is distributed
under the Apache License:


                                 Apache License
                           Version 2.0, January 2004
                        http://www.apache.org/licenses/

   TERMS AND CONDITIONS FOR USE, REPRODUCTION, AND DISTRIBUTION

   1. Definitions.

      "License" shall mean the terms and conditions for use, reproduction,
      and distribution as defined by Sections 1 through 9 of this document.

      "Licensor" shall mean the copyright owner or entity authorized by
      the copyright owner that is granting the License.

      "Legal Entity" shall mean the union of the acting entity and all
      other entities that control, are controlled by, or are under common
      control with that entity. For the purposes of this definition,
      "control" means (i) the power, direct or indirect, to cause the
      direction or management of such entity, whether by contract or
      otherwise, or (ii) ownership of fifty percent (50%) or more of the
      outstanding shares, or (iii) beneficial ownership of such entity.

      "You" (or "Your") shall mean an individual or Legal Entity
      exercising permissions granted by this License.

      "Source" form shall mean the preferred form for making modifications,
      including but not limited to software source code, documentation
      source, and configuration files.

      "Object" form shall mean any form resulting from mechanical
      transformation or translation of a Source form, including but
      not limited to compiled object code, generated documentation,
      and conversions to other media types.

      "Work" shall mean the work of authorship, whether in Source or
      Object form, made available under the License, as indicated by a
      copyright notice that is included in or attached to the work
      (an example is provided in the Appendix below).

      "Derivative Works" shall mean any work, whether in Source or Object
      form, that is based on (or derived from) the Work and for which the
      editorial revisions, annotations, elaborations, or other modifications
      represent, as a whole, an original work of authorship. For the purposes
      of this License, Derivative Works shall not include works that remain
      separable from, or merely link (or bind by name) to the interfaces of,
      the Work and Derivative Works thereof.

      "Contribution" shall mean any work of authorship, including
      the original version of the Work and any modifications or additions
      to that Work or Derivative Works thereof, that is intentionally
      submitted to Licensor for inclusion in the Work by the copyright owner
      or by an individual or Legal Entity authorized to submit on behalf of
      the copyright owner. For the purposes of this definition, "submitted"
      means any form of electronic, verbal, or written communication sent
      to the Licensor or its representatives, including but not limited to
      communication on electronic mailing lists, source code control systems,
      and issue tracking systems that are managed by, or on behalf of, the
      Licensor for the purpose of discussing and improving the Work, but
      excluding communication that is conspicuously marked or otherwise
      designated in writing by the copyright owner as "Not a Contribution."

      "Contributor" shall mean Licensor and any individual or Legal Entity
      on behalf of whom a Contribution has been received by Licensor and
      subsequently incorporated within the Work.

   2. Grant of Copyright License. Subject to the terms and conditions of
      this License, each Contributor hereby grants to You a perpetual,
      worldwide, non-exclusive, no-charge, royalty-free, irrevocable
      copyright license to reproduce, prepare Derivative Works of,
      publicly display, publicly perform, sublicense, and distribute the
      Work and such Derivative Works in Source or Object form.

   3. Grant of Patent License. Subject to the terms and conditions of
      this License, each Contributor hereby grants to You a perpetual,
      worldwide, non-exclusive, no-charge, royalty-free, irrevocable
      (except as stated in this section) patent license to make, have made,
      use, offer to sell, sell, import, and otherwise transfer the Work,
      where such license applies only to those patent claims licensable
      by such Contributor that are necessarily infringed by their
      Contribution(s) alone or by combination of their Contribution(s)
      with the Work to which such Contribution(s) was submitted. If You
      institute patent litigation against any entity (including a
      cross-claim or counterclaim in a lawsuit) alleging that the Work
      or a Contribution incorporated within the Work constitutes direct
      or contributory patent infringement, then any patent licenses
      granted to You under this License for that Work shall terminate
      as of the date such litigation is filed.

   4. Redistribution. You may reproduce and distribute copies of the
      Work or Derivative Works thereof in any medium, with or without
      modifications, and in Source or Object form, provided that You
      meet the following conditions:

      (a) You must give any other recipients of the Work or
          Derivative Works a copy of this License; and

      (b) You must cause any modified files to carry prominent notices
          stating that You changed the files; and

      (c) You must retain, in the Source form of any Derivative Works
          that You distribute, all copyright, patent, trademark, and
          attribution notices from the Source form of the Work,
          excluding those notices that do not pertain to any part of
          the Derivative Works; and

      (d) If the Work includes a "NOTICE" text file as part of its
          distribution, then any Derivative Works that You distribute must
          include a readable copy of the attribution notices contained
          within such NOTICE file, excluding those notices that do not
          pertain to any part of the Derivative Works, in at least one
          of the following places: within a NOTICE text file distributed
          as part of the Derivative Works; within the Source form or
          documentation, if provided along with the Derivative Works; or,
          within a display generated by the Derivative Works, if and
          wherever such third-party notices normally appear. The contents
          of the NOTICE file are for informational purposes only and
          do not modify the License. You may add Your own attribution
          notices within Derivative Works that You distribute, alongside
          or as an addendum to the NOTICE text from the Work, provided
          that such additional attribution notices cannot be construed
          as modifying the License.

      You may add Your own copyright statement to Your modifications and
      may provide additional or different license terms and conditions
      for use, reproduction, or distribution of Your modifications, or
      for any such Derivative Works as a whole, provided Your use,
      reproduction, and distribution of the Work otherwise complies with
      the conditions stated in this License.

   5. Submission of Contributions. Unless You explicitly state otherwise,
      any Contribution intentionally submitted for inclusion in the Work
      by You to the Licensor shall be under the terms and conditions of
      this License, without any additional terms or conditions.
      Notwithstanding the above, nothing herein shall supersede or modify
      the terms of any separate license agreement you may have executed
      with Licensor regarding such Contributions.

   6. Trademarks. This License does not grant permission to use the trade
      names, trademarks, service marks, or product names of the Licensor,
      except as required for reasonable and customary use in describing the
      origin of the Work and reproducing the content of the NOTICE file.

   7. Disclaimer of Warranty. Unless required by applicable law or
      agreed to in writing, Licensor provides the Work (and each
      Contributor provides its Contributions) on an "AS IS" BASIS,
      WITHOUT WARRANTIES OR CONDITIONS OF ANY KIND, either express or
      implied, including, without limitation, any warranties or conditions
      of TITLE, NON-INFRINGEMENT, MERCHANTABILITY, or FITNESS FOR A
      PARTICULAR PURPOSE. You are solely responsible for determining the
      appropriateness of using or redistributing the Work and assume any
      risks associated with Your exercise of permissions under this License.

   8. Limitation of Liability. In no event and under no legal theory,
      whether in tort (including negligence), contract, or otherwise,
      unless required by applicable law (such as deliberate and grossly
      negligent acts) or agreed to in writing, shall any Contributor be
      liable to You for damages, including any direct, indirect, special,
      incidental, or consequential damages of any character arising as a
      result of this License or out of the use or inability to use the
      Work (including but not limited to damages for loss of goodwill,
      work stoppage, computer failure or malfunction, or any and all
      other commercial damages or losses), even if such Contributor
      has been advised of the possibility of such damages.

   9. Accepting Warranty or Additional Liability. While redistributing
      the Work or Derivative Works thereof, You may choose to offer,
      and charge a fee for, acceptance of support, warranty, indemnity,
      or other liability obligations and/or rights consistent with this
      License. However, in accepting such obligations, You may act only
      on Your own behalf and on Your sole responsibility, not on behalf
      of any other Contributor, and only if You agree to indemnify,
      defend, and hold each Contributor harmless for any liability
      incurred by, or claims asserted against, such Contributor by reason
      of your accepting any such warranty or additional liability.

   END OF TERMS AND CONDITIONS
This bot will monitor skins of your choice, and then purchase them automatically.
At the moment it works only with CHROMIUM BASED BROWSERS!
This bot will not work with stickers and cases, keep this in mind. (You can check what is planned at the bottom of README). Also consider that I’m working on this project alone, so there’s a chance that something won’t work as it should. If you find a bug, open a ticket in the issue and I’ll try to fix it.
Features
Skin monitoring
Automatic purchase
Logging into file after purchase
You can choose specific patterns or floats for bot to find
constmc=require('minecraft_head');// Import Moduleletplayer=newmc.player('Sigma76');// Create a new Player (Can use Name or Uuid)
Get UUID or a player:
// Will take Player Object or player name as a stringmc.nameToUuid(player).then(data=>{console.log(data.uuid);}).catch(console.log);// Another way if using player Objectplayer.uuid.then(uuid=>{console.log(uuid);});
Get Player Name:
// Will take player Object or Uuid as a stringmc.uuidToName(player).then(data=>{console.log(data.name);}).catch(console.log);// Another way if using player Objectplayer.name.then(name=>{console.log(name);});
Get full name history of a player:
// Will take Player Object or Uuid as a stringmc.getNameHistory(player).then(data=>{console.log(data);}).catch(console.log);
Get a player’s name at a specific time:
// Will take Player Object or Uuid as a string// Also takes a Date Object// Due to API limitations anything before the first name change will be the accounts original name.mc.getNameAtDate(player,newDate('2017-01-01')).then(name=>{console.log(name);}).catch(console.log);
Get Player Skin (and cape):
// Will take Player Object or Uuid as a string// Before the Player Object you would need to convert a player name to Uuid yourselfmc.getSkin(player).then(skin=>{console.log(skin);}).catch(console.log);