Author: 3ul7q9dn0uo3

  • LittleLemonAPI

    LittleLemonAPI

    Coursera Meta Django DjangoREST MySQL

    Creating a fully functioning API project for the Littlelemon Restaurant so that client application developers can consume the APIs to develop web and mobile applications. People with different roles will be able to browse, add and edit menu items, place orders, browse orders, assign delivery crew to orders and finally deliver the orders.

    User registration and token generation endpoints

    • Using Djoser to automatically create endpoints

      • POST: auth/users/: An api endpoint for user registration

      • GET: auth/users/me: Display the current user

      • POST: auth/token/login: Generate user’s access-token {username and password}

    Menu-Items Endpoints

    • api/menu-items Role: Customer and Delivery Crew:

      • GET: List all menu items

      • POST,PUT,PATCH,DELETE: Denies access and returns 403-Unauthorized HTTP status code

      Role: Manager

      • GET: List all menu items

      • POST: Creates a new menu item

    • api/menu-items/{menuItem}: Role: Customer and Delivery Crew

      • GET: List a single menu item

      • POST,PUT,PATCH,DELETE: Denies access and returns 403-Unauthorized HTTP status code

      Role: Manager

      • GET: List a single menu item.

      • PUT,PATCH: Updates single menu item.

      • DELETE: Deletes menu item

    User group management endpoints

    • api/groups/manager/users:

      Role: Manager

      • GET: Returns all managers

      • POST: Assigns the username in the payload to the manager group

      • api/groups/manager/users/int:id:

        • DELETE: Removes this particular user from the manager group and returns 200 – Success if everything is okay. If user not found, return 404 – Not Found
    • api/groups/delivery-crew/users:

      Role: Manager

      • GET: Returns all delivery crew members

      • POST: Assigns the username in the payload to the delivery group

      • api/groups/delivery-crew/users/int:id:

        • DELETE: Removes this particular user from the delivery group and returns 200 – Success if everything is okay. If user not found, return 404 – Not Found

    Cart management endpoints

    • api/cart/menu-items:

      Role: Customer

      • GET: Returns current items int the cart for the current user

      • POST: Adds the menu item to the cart.

      • DELETES: Deletes all menu-items created by the current user token

    Order management enpoints

    • api/orders: Role: Customer

      • GET: Returns all orders with order items created by the user

      • POST: Creates a new order item for the current user. Gets current cart items from the cart endpoint and adds those items to the order items table. Then deletes all items from the cart for the user.

      Role: Manager

      • GET: Returns all orders with order items by all users

      Role: Delivery Crew

      • GET: Returns all orders with order items assigned to the delivery crew
    • api/orders/{orderId}:

      Role: Customer

      • GET: Returns all items for this order id. If the order ID doesn’t belong to the current user, it displays an appropriate HTTP error status code.

      Role: Manager

      • PUT,PATCH: Updates the order. A manager can use this endpoint to set a delivery crew to this order, and also update the order status to 0 or 1. If a delivery crew is assigned to this order and the status = 0, it means the order is out for delivery. If a delivery crew is assigned to this order and the status = 1, it means the order has been delivered.

      • DELETE: Deletes this order

      Role: Delivery Crew

      • PATCH: A delivery crew can use this endpoint to update the order status to 0 or 1. The delivery crew will not be able to update anything else in this order.

    Pagination, filtering and proper sorting capabilities were applied to the api/menu-items and api/orders endpoints.

    API throttling was also applied for authenticated users and anonymous or unauthenticated users.

    Visit original content creator repository https://github.com/Rhydian-olasupo/LittleLemonAPI
  • Generalized-regression-neural-networks-library-from-scratch

    Generalized Regression Neural Networks (GRNN)

    Generalized regression neural network (GRNN) is a variation to radial basis neural networks. GRNN was suggested by D.F. Specht in 1991.GRNN can be used for regression, prediction, and classification. GRNN can also be a good solution for online dynamical systems. GRNN represents an improved technique in the neural networks based on the nonparametric regression. The idea is that every training sample will represent a mean to a radial basis neuron.[1]

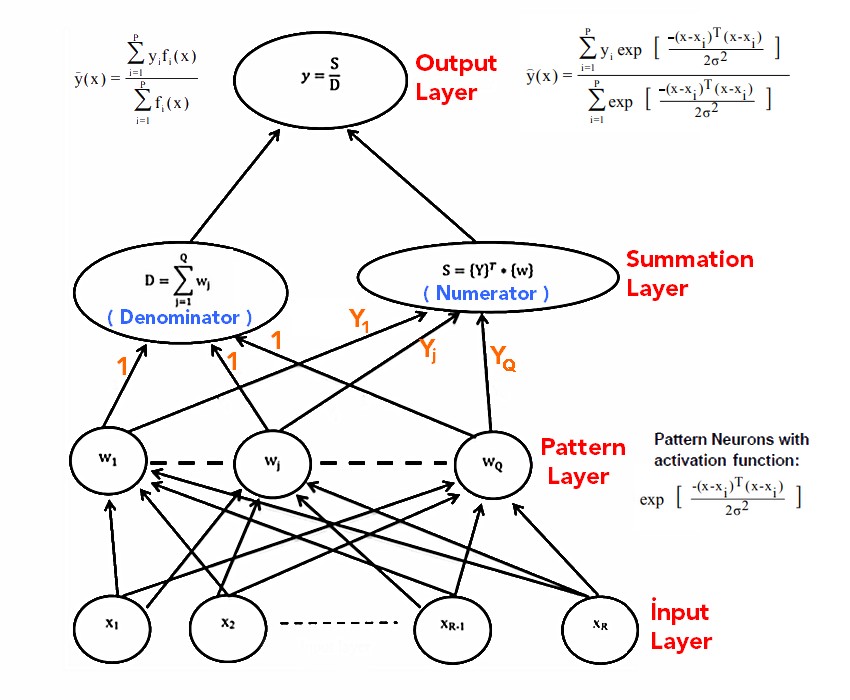
    GRNN is a feed forward ANN model consisting of four layers: input layer, pattern layer, summation layer and output layer. Unlike backpropagation ANNs, iterative training is not required. Each layer in the structure consists of different numbers of neurons and the layers are connected to the next layer in turn. [2]

    • In the first layer, the input layer, the number of neurons is equal to the number of properties of the data.[3]

    • In the pattern layer, the number of neurons is equal to the number of data in the training set. In the neurons in this layer, the distances between the training data and the test data are calculated and the results are passed through the radial based function (activation function) with the σ value and the weight values are obtained.[3]

    • The summation layer has two subparts one is Numerator part and another one is Denominator part. Numerator part contains summation of the multiplication of training output data and activation function output (weight values). Denominator is the summation of all weight values. This layer feeds both the Numerator & Denominator to the next output layer.[3]

    • The output layer contains one neuron which calculate the output by dividing the numerator part of the Summation layer by the denominator part.[3]

    Algorithm-Graph

                                                   The general structure of GRNN [3]
    

    Training Procedure

    Training procedure is to find out the optimum value of σ. Best practice is that find the position where the MSE (Mean Squared Error) is minimum. First divide the whole training sample into two parts. Training sample and test sample. Apply GRNN on the test data based on training data and find out the MSE for different σ. Now find the minimum MSE and corresponding value of σ. [3]

    Advantages of GRNN

    • The main advantage of GRNN is to speed up the training process which helps the network to be trained faster.

    • The network is able to learning from the training data by “1-pass” training in a fraction of the time it takes to train standard feed forward networks.

    • The spread, Sigma (σ), is the only free parameter in the network, which often can be identified by the V-fold or Split-Sample cross validation.

    • Unlike standard feed forward networks, GRNN estimation is always able to converge to a global solution and won’t be trapped by a local minimum. [3]

    Disadvantages of GRNN

    • Its size can be huge, which would make it computationally expensive. [4]

    Example

    Retrieved from [3]

    Example

    Resources

    [1] https://www.wikizeroo.org/index.php?q=aHR0cHM6Ly9lbi53aWtpcGVkaWEub3JnL3dpa2kvR2VuZXJhbF9yZWdyZXNzaW9uX25ldXJhbF9uZXR3b3Jr

    [2] https://www.journalagent.com/pajes/pdfs/PAJES_24_5_857_863.pdf

    [3] https://easyneuralnetwork.blogspot.com/2013/07/grnn-generalized-regression-neural.html

    Visit original content creator repository https://github.com/muhendis/Generalized-regression-neural-networks-library-from-scratch
  • Generalized-regression-neural-networks-library-from-scratch

    Generalized Regression Neural Networks (GRNN)

    Generalized regression neural network (GRNN) is a variation to radial basis neural networks. GRNN was suggested by D.F. Specht in 1991.GRNN can be used for regression, prediction, and classification. GRNN can also be a good solution for online dynamical systems. GRNN represents an improved technique in the neural networks based on the nonparametric regression. The idea is that every training sample will represent a mean to a radial basis neuron.[1]

    GRNN is a feed forward ANN model consisting of four layers: input layer, pattern layer, summation layer and output layer. Unlike backpropagation ANNs, iterative training is not required. Each layer in the structure consists of different numbers of neurons and the layers are connected to the next layer in turn. [2]

    • In the first layer, the input layer, the number of neurons is equal to the number of properties of the data.[3]

    • In the pattern layer, the number of neurons is equal to the number of data in the training set. In the neurons in this layer, the distances between the training data and the test data are calculated and the results are passed through the radial based function (activation function) with the σ value and the weight values are obtained.[3]

    • The summation layer has two subparts one is Numerator part and another one is Denominator part. Numerator part contains summation of the multiplication of training output data and activation function output (weight values). Denominator is the summation of all weight values. This layer feeds both the Numerator & Denominator to the next output layer.[3]

    • The output layer contains one neuron which calculate the output by dividing the numerator part of the Summation layer by the denominator part.[3]

    Algorithm-Graph

                                                   The general structure of GRNN [3]
    

    Training Procedure

    Training procedure is to find out the optimum value of σ. Best practice is that find the position where the MSE (Mean Squared Error) is minimum. First divide the whole training sample into two parts. Training sample and test sample. Apply GRNN on the test data based on training data and find out the MSE for different σ. Now find the minimum MSE and corresponding value of σ. [3]

    Advantages of GRNN

    • The main advantage of GRNN is to speed up the training process which helps the network to be trained faster.

    • The network is able to learning from the training data by “1-pass” training in a fraction of the time it takes to train standard feed forward networks.

    • The spread, Sigma (σ), is the only free parameter in the network, which often can be identified by the V-fold or Split-Sample cross validation.

    • Unlike standard feed forward networks, GRNN estimation is always able to converge to a global solution and won’t be trapped by a local minimum. [3]

    Disadvantages of GRNN

    • Its size can be huge, which would make it computationally expensive. [4]

    Example

    Retrieved from [3]

    Example

    Resources

    [1] https://www.wikizeroo.org/index.php?q=aHR0cHM6Ly9lbi53aWtpcGVkaWEub3JnL3dpa2kvR2VuZXJhbF9yZWdyZXNzaW9uX25ldXJhbF9uZXR3b3Jr

    [2] https://www.journalagent.com/pajes/pdfs/PAJES_24_5_857_863.pdf

    [3] https://easyneuralnetwork.blogspot.com/2013/07/grnn-generalized-regression-neural.html

    Visit original content creator repository
    https://github.com/muhendis/Generalized-regression-neural-networks-library-from-scratch

  • webpack-template

    Webpack work template

    Webpack is a module bundler. Its main purpose is to bundle JavaScript files for usage in a browser, yet it is also capable of transforming, bundling, or packaging just about any resource or asset.

    Author: Vedees | Youtube guide (ru)

    Features:

    • separated configs for dev and prod
    • typescript / javascript full support
    • sass / css full support
    • full babel & postcss setup
    • 0 dependencies
    • the best optimization for your production
    • easy webpack and babel customization

    Everybody knows that developing runs on coffee! Thanks for your support!

    Buy me a coffee

    Build Setup:

    # Download repository:
    git clone https://github.com/vedees/webpack-template webpack-template
    
    # Go to the app:
    cd webpack-template
    
    # Install dependencies:
    # npm install
    # or:
    yarn
    
    # Server with hot reload at http://localhost:8084/
    # npm run start
    # or:
    yarn start
    
    # Output will be at dist/ folder
    # npm run build
    # or:
    yarn build

    Project Structure:

    • public/*.html – HTML files
    • src/app – core app
    • src/shared – shared files
    • src/shared/img – images folder (! for html calls use correct path: static/img/some.jpg)
    • src/shared/misc – misc files (i.g. favicon, sitemap, etc.)
    • src/index.ts – main app entity

    Configs:

    • /babel-defines.js – config for babel
    • /webpack/webpack-pages.js – config for html pages
    • /webpack/webpack-defines.js – config for entire webpack

    Main entry point:

    • src/app/index.ts – core entry point

    Defines:

    Core webpack config from /webpack/webpack-defines.js:

    const PATHS = {
      // path to the src dir
      src: path.join(__dirname, '../src'),
      // path to the output dir
      dist: path.join(__dirname, '../dist'),
      // path to the public files (html files)
      public: path.join(__dirname, '../public'),
    
      // path to output sub dir (js, css, fonts, etc.)
      assets: 'assets/',
      // path to output sub dir (img, icons, etc.)
      static: 'static/'
    }

    Pages config:

    Pages config from /webpack/webpack-pages.js:

    const pages = [
      {
        // page title
        title: 'Home page',
        // template name `public/index.html`
        template: 'index.html',
        // output filename `dist/index.html`
        filename: 'index.html',
    
        // other options can be here
      },
      {
        title: 'About page',
        template: 'about.html',
        filename: 'about.html',
      }
    ]

    You can pass a hash of configuration options to html-webpack-plugin.

    Allowed values are as follows: https://github.com/jantimon/html-webpack-plugin#options

    Manual pages setup:

    In case if you don’t want to use Pages config:

    1. Create another html file in ./public
    2. Go to ./webpack/webpack.common.js
    3. Add new page to the config:
        // index page:
        new HtmlWebpackPlugin({
          title: 'Home page',
          favicon: defines.src + '/shared/misc/favicon.ico',
          template: defines.public + '/index.html', // public/index.html page
          filename: 'index.html' // output file
        }),
        // about page:
        new HtmlWebpackPlugin({
          title: 'About page',
          favicon: defines.src + '/shared/misc/favicon.ico',
          template: defines.public + '/about.html', // public/about.html page
          filename: 'about.html' // output file
        }),

    Import libs example:

    Install it:

    yarn add bootstrap react react-dom

    Import libs to src/app/index.ts:

    // React example
    import React from 'react'
    
    // Bootstrap example (with custom js imports)
    import Bootstrap from 'bootstrap/dist/js/bootstrap.min.js'
    import 'bootstrap/dist/js/bootstrap.min.js'

    Import SASS / CSS libs example:

    Import libs to src/app/index.scss:

    // sass lib import example:
    @import '../../node_modules/spinners/stylesheets/spinners';
    // css lib import example:
    @import '../../node_modules/flickity/dist/flickity.css';

    React example:

    Here’s an example with React + i18n Provider.

    Install react:

    yarn add react react-dom

    Create div with id app in public/index.html:

    <div id="app"></div>

    Init the app in src/app/index.ts:

    import React from 'react'
    import { createRoot } from 'react-dom/client'
    
    // app styles
    import './index.scss'
    
    // local providers:
    import { I18nProvider } from './providers/I18nProvider'
    
    const container = document.getElementById('app') as HTMLElement
    const root = createRoot(container)
    
    root.render(
      <React.StrictMode>
        <I18nProvider>...</I18nProvider>
      </React.StrictMode>
    )

    File src/app/providers/I18nProvider.tsx:

    import React, { FC, PropsWithChildren } from 'react'
    
    export const I18nProvider: FC<PropsWithChildren> = ({ children }) => {
      // ...
    
      return <I18n locale={detectedLocale}>{children}</I18n>
    }

    Vue example:

    Install vue:

    yarn add vue

    Init the app in src/app/index.ts:

    // vue example (react one is above):
    const app = new Vue({
      el: '#app'
    })

    Create div with id app in public/index.html:

    <div id="app"></div>

    Adding Vue Components:

    Create your component in src/app/components/.

    HTML Usage (in *.html files):

    Init component in src/app/index.ts:

    Vue.component('example-component', require('./components/Example.vue').default)

    In any html files:

    <example-component />

    VUE Usage (in *.vue files):

    Import component:

    import ExampleComponent from '@/components/Example.vue'

    Init component (template):

    <Example />

    Register component (script):

    components: {
      Example: ExampleComponent
    }

    Adding Google Fonts:

    Connect fonts to public/index.html:

    <link rel="preconnect" href="https://fonts.googleapis.com" />
    <link rel="preconnect" href="https://fonts.gstatic.com" crossorigin />
    <link href="https://fonts.googleapis.com/css2?family=Open+Sans:wght@400;500&display=swap" rel="stylesheet" />

    Change the font in src/app/styles/body.scss:

    html {
      font-family: 'Open Sans', -apple-system, BlinkMacSystemFont, 'Segoe UI', Helvetica, 'Apple Color Emoji', Arial, sans-serif, 'Segoe UI Emoji', 'Segoe UI Symbol' !important;
    }

    Adding local fonts:

    In case if you don’t want to use Google Fonts:

    • Download fonts
    • Add fonts to the (i.g. /src/shared/fonts/OpenSans/...).

    Then add @font-face in some .scss file (i.g. /src/app/styles/font.scss):

    // Open Sans example:
    @font-face {
      font-family: 'Open Sans';
      font-style: normal;
      font-weight: 400;
      font-stretch: 100%;
      font-display: swap;
      src: url('/static/fonts/OpenSans/Open-Sans.woff2') format('woff2');
      unicode-range: U+0460-052F, U+1C80-1C88, U+20B4, U+2DE0-2DFF, U+A640-A69F, U+FE2E-FE2F;
    }

    The last step is to copy these fonts into the /dist folder every time you build the project.

    Add another config for CopyWebpackPlugin to /webpack/webpack.common.js:

    new CopyWebpackPlugin({
      // ...
    
      // `shared/fonts` to `dist/static/fonts`
      {
        from: `${defines.src}/shared/fonts`,
        to: `${defines.dist}/${defines.static}/fonts`
      },
    })

    Change the font in src/app/styles/body.scss:

    html {
      font-family: 'Open Sans', -apple-system, BlinkMacSystemFont, 'Segoe UI', Helvetica, 'Apple Color Emoji', Arial, sans-serif, 'Segoe UI Emoji', 'Segoe UI Symbol' !important;
    }

    License:

    MIT

    Copyright (c) 2018-present, Evgenii Vedegis

    Visit original content creator repository https://github.com/vedees/webpack-template
  • calendar

    Visit original content creator repository
    https://github.com/nwest88/calendar

  • EasyCache

    Icon

    EasyCache

    v2.0.0.0 – October 2024

    Dependencies

    Assembly Version
    NET Core 6.0 (LTS)
    NET Framework 4.8.1
    System.Runtime.Caching 8.0.0.1
    • A memory caching library which offers timed evictions for stored objects.

    • I’ve also created my own version of Microsoft’s memory cache to show how you could roll your own.

    • This solution includes a console application for testing the DLL.

    Usage

     // Instantiate
     var cache = new CacheHelper<string>();
    
     // Add an item
     cache.AddOrUpdate("key1", "value1", TimeSpan.FromSeconds(3));
     // Add an item to update
     cache.AddOrUpdate("key3", "value3", DateTime.Now.AddMinutes(1));
     // Update an item
     cache.AddOrUpdate("key3", "updated value3", DateTime.Now.AddMinutes(2));
    
     // Check expiry
     var dt = cache.GetExpiration("key3");
     Console.WriteLine($"key3 will expire at {dt.Value.ToLongTimeString()}");
    
     // Check if exists
     Console.WriteLine($"The current cache does {(cache.Contains("key1") ? "" : "not")} contain key1");
    
     // Refresh the expiration by fetching
     var temp = cache.Get("key1");
    
     // Delete an item
     cache.Remove("key1");
    
     // Check if exists after removal
     Console.WriteLine($"The current cache does {(cache.Contains("key1") ? "" : "not")} contain key1");
    
     // Fetching all keys
     var keys = cache.GetAllKeys();
     foreach (var key in keys) { /* do something */ }
    
     // Fetching all objects
     var objs = cache.GetCacheAsEnumerable();
     foreach (var obj in objs) { /* do something */ }
    
     // Clean-up
     cache.Dispose();

    📷 Screenshot

    Sample

    🧾 License/Warranty

    • Permission is hereby granted, free of charge, to any person obtaining a copy of this software and associated documentation files (the “Software”), to deal in the Software without restriction, including without limitation the rights to use, copy, modify, merge, publish and distribute copies of the Software, and to permit persons to whom the Software is furnished to do so, subject to the following conditions: The above copyright notice and this permission notice shall be included in all copies or substantial portions of the Software.
    • The software is provided “as is”, without warranty of any kind, express or implied, including but not limited to the warranties of merchantability, fitness for a particular purpose and noninfringement. In no event shall the author or copyright holder be liable for any claim, damages or other liability, whether in an action of contract, tort or otherwise, arising from, out of or in connection with the software or the use or other dealings in the software.
    • Copyright © 2025. All rights reserved.

    📋 Proofing

    • This application was compiled and tested using VisualStudio 2022 on Windows 10/11 versions 22H2, 21H2, 21H1, and 23H2.
    Visit original content creator repository https://github.com/GuildOfCalamity/EasyCache
  • eslint-config-biome


    logo

    eslint-config-biome

    npm npm

    Disables ESLint rules that have an equivalent and recommended Biome rule, allowing the simultaneous use of Biome and ESLint.


    💿 Installation

    npm install -D eslint-config-biome # or your preferred package manager ;)
    • eslint.config.js: Import eslint-config-biome and have it as the last item in the configuration array

      import biome from "eslint-config-biome";
      
      export default [
        // other configs,
        biome,
      ];
    • Or .eslintrc.* (eslint <= v8): Add the following as the last item in the "overrides" array. Create it if necessary.

      {
        "overrides": [
          // other overrides,
          {
            files: ["*.ts", "*.js", "*.tsx", "*.jsx"],
            extends: ["biome"],
          }
        ],
      }

    ℹ️ Info

    • In VSCode, to apply Biome and ESLint on save, you should have these in your project’s .vscode/settings.json:

      {
        "editor.codeActionsOnSave": {
          "source.fixAll.eslint": "explicit",
          "source.organizeImports.biome": "explicit",
          "quickfix.biome": "explicit"
        },
        "editor.defaultFormatter": "biomejs.biome"
      }
    • For package.json scripts and CI, I recommend running biome before eslint for faster failure detection.

      "scripts": {
        "lint": "biome check --unsafe --fix && eslint --fix .",
        "lint:check": "biome check --unsafe && eslint .",
      }
    • This package includes eslint-config-prettier, so formatting rules are also disabled as Biome is equivalent to Prettier. Attribution.

    Visit original content creator repository https://github.com/ftzi/eslint-config-biome
  • GunslingerTF

    🕹 Sonny’s TF2 config

    My personal Team Fortress 2 configuration. I wrote this config between 2012 – 2015, when I played the game competitively at the European TF2 League. The config is primarily intended for competitive play and I’ve used in 6v6 & 9v9 competitive tournaments. The majority of features are also useful for casual play. Do not expect any significant performance gains from this config, although it contains some optimizations. You can include your own graphical configurations and extend it.

    🚧 This config doesn’t support the new x64 bit TF2 client. It was developed, tested and used with the old x32 bit one more than 10 years ago.


    🧩 Features

    • Null-movement
    • Callouts (🚧 WIP)
    • Crouch Jump (CTap)
      • 💡 You’ll need explicitly execute this script in your soldier.cfg file. In addition to that you’ll have to rebind MOUSE2 in every other class config
    • Auto record tournament demos
    • Disabled tutorials
    • Custom viewmodel FOV switcher
      • Hold MOUSE4 and move the scroll up or down in order to increase/decrease viewmodel FOV
    • Loadout switcher
      • Hold ALT+6-9 to switch through the 4 default loadout slots + a hidden 5th one
    • Custom server admin mode
      • Up to as many servers as you wish. list of configs and maps changable on the moment with a simple command such as: blands instead of 2x rcon changelevel cp_badlands / ecp6 instead of !rcon exec etf2l_6v6_5cp; open it for how to use it and more features
    • Micspam loopback script
    • Chat & Voice toggles
    • In-game memory compactor
      • Frees up memory
    • 4 different network presets
      • Chris’ Bad
      • Chris’ Good
      • m0re
      • Mine (Default)
    • Netgraph presets
    • Built in respawn timer
      • Useful in competitive to keep track of medic respawns etc, it shows everytime you hit TAB
    • Instant FIX button.
      • Restarts sound, hud, heartbeat and records a temp demo
    • Wait Tester (F11)
    • Sourcemod plugin lister (listplugins)
    • Offline Jumping (🚧 WIP)
      • Provide 3 teleports (save/tp)
      • Health Regen
    • Numpad class switcher

    Custom Binds:

    Key Action
    F2 Reloads the config
    / Toggles your viewmodels on/off
    F11 Checks if wait is enabled on the server
    F1 (Hold) All in one fix it button
    MOUSE4 (Hold) + MWHEELUP / MWHEELDOWN Viewmodel FOV switcher
    ALT (Hold) + 6-0 (Non-numpad keys) switch through the 4 default loadout slots + a hidden 5th one
    END Suicide
    TAB Scoreboard, NET Graph, RED+BLU respawn times (when tournament mode is enabled) & map time left
    Numpad 1-9 Switches between the nine classes
    Numpad ENTER 1st Press: Turns OFF Text Chat. 2nd Press: Turns OFF Voice Chat. 3rd Press: Toggles ON Text And Voice Chat
    Pause Pauses the game (does not work on all keyboards)

    🔧 Installation

    1. Download the master ZIP file or clone the repository.
    2. Copy the contents of the artifact in the following directory: \steamapps\common\Team Fortress 2\tf\custom\my_custom_files\cfg\
    3. 💡 Optional: Make the files & directories READ-ONLY to prevent any changes in the settings of this config.
    4. Paste surfaceproperties.txt in \custom\my_custom_files\scripts.

    ❗ If you have any other configs created with clugu or some other config generator it is recommended that you remove all *.cfg files and reset all cvars via steam://runsafe/440

    🛩 Launch options

    -novid -high -console -w XXXX -h XXXX -dxlevel XX

    💡 If you want the most of your machine use -dxlevel 81 otherwise use -dxlevel 95.

    💭Where XXXX insert a resolution 1x/2x/3x lower than your native one, it can help performance.

    Visit original content creator repository
    https://github.com/SonnyRR/GunslingerTF

  • yamine

    yamine Mean Bean CI

    A simple CLI for combining json and yaml files

    Install

    Available via Homebrew/Linuxbrew

    brew install avencera/tap/yamine

    OR

    Install from a github release:

    curl -LSfs https://avencera.github.io/yamine/install.sh | sh -s -- --git avencera/yamine

    OR

    Install using cargo:

    cargo install yamine or cargo binstall yamine

    OR

    Download a release directly from github: github.com/avencera/yamine/releases

    Usage

    yamine --help

    Combine JSON/YAML files into a single file
    
    Usage: yamine [OPTIONS] [FILES_OR_FOLDERS]...
    
    Arguments:
      [FILES_OR_FOLDERS]...  File(s) or folder you want to run in
    
    Options:
      -i, --stdin            Read from STDIN
      -d, --depth <DEPTH>    Number of folder depth to recurse into [default: 1]
      -o, --output <OUTPUT>  Output file name [default: combined.yaml]
          --dry-run          Default mode
      -w, --write            Write new output file
      -s, --stdout           Outputs combined file contents to STDOUT
      -f, --format <FORMAT>  The format for the output file, defaults to yaml [default: yaml] [possible values: yaml, json-array, json-k8s, json]
      -h, --help             Print help
      -V, --version          Print version
    

    Examples

    • Combine all yaml and json files in the current folder and creates combined.yaml file
      • yamine -w .
    • Combine all yaml and json files in the current folder and creates a combined.json file in json-k8s format:
      • yamine --write --format json-k8s --output combined.json .
    • Output the combined file to STDOUT in json format:
      • yamine --stdout -f json .
    • Convert YAML from stdin and output as JSON to stdout
      • pbpaste | yamine --stdin --stdout -f json

    Formats

    • yaml – a multi document yaml file separated by --- (a kubernetes multi resource document)

      ---
      apiVersion: traefik.containo.us/v1alpha1
      kind: IngressRoute
      ---
      apiVersion: v1
      kind: Namespace
      metadata:
        name: example
      ---
      kind: ServiceAccount
      apiVersion: v1
      ---
      apiVersion: v1
      kind: Service
      ---
      apiVersion: apps/v1
      kind: Deployment
    • json – a json file with each combined file being an element in the array

      [
          {
            "apiVersion": "traefik.containo.us/v1alpha1",
            "kind": "IngressRoute"
            ...
          },
          {
            "apiVersion": "v1",
            "kind": "Namespace",
            ...
          },
          {
            "apiVersion": "v1",
            "kind": "ServiceAccount",
            ...
          },
          {
            "apiVersion": "v1",
            "kind": "Service",
            ...
          },
      ]
    • json-k8s – a kubernetes multi resource json document ex:

      {
        "kind": "List",
        "apiVersion": "v1",
        "items": [
          {
            "apiVersion": "traefik.containo.us/v1alpha1",
            "kind": "IngressRoute"
            ...
          },
          {
            "apiVersion": "v1",
            "kind": "Namespace",
            ...
          },
          {
            "apiVersion": "v1",
            "kind": "ServiceAccount",
            ...
          },
          {
            "apiVersion": "v1",
            "kind": "Service",
            ...
          },
        ]
      }
    Visit original content creator repository https://github.com/avencera/yamine
  • Material-Message-Box

    WPF Material Message Box

    A WPF Message Box implementing material design

    Actions Status

    Code quality score

    Code grade

    Release

    Nuget

    Nuget

    ❇️ Main Features

    The message box has the following custom features:

    ✅ Material Theme design

    ✅ Custom styles for border window, message foreground and background, title foreground and background, border, etc

    ✅ Button to copy message box details to clipboard

    ✅ Scrollable message box content

    ✅ Right to left (RTL) support

    ✅ Message content is .NET UIElement which can host any content

    ❇️ Installing

    ▶️ Download from Nuget ☁⤵

    ▶️ Install from Package manager Console

    $ Install-Package MaterialMessageBox

    Or, if using dotnet

    $ dotnet add package MaterialMessageBox

    ❇️ Usage (Screenshots)

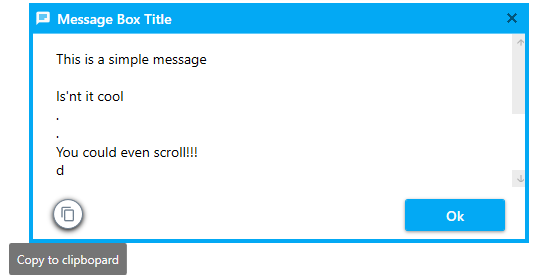
    Creating a simple message box

    MaterialMessageBox.Show("Your cool message here", "The awesome message title");

    Simple Message

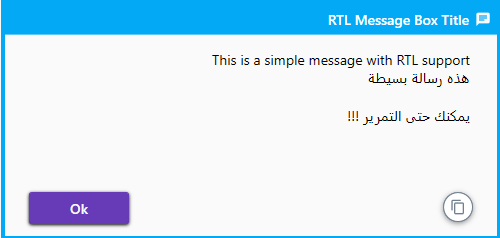
    Show a message box with RTL support

    MaterialMessageBox.Show("Your cool message here", "The awesome message title", true);

    message box with RTL support

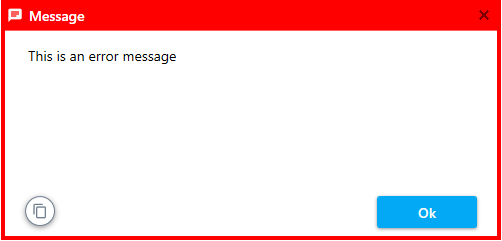
    Showing an error message

    MaterialMessageBox.ShowError(@"This is an error message");

    Error Message

    Showing an error message

    MaterialMessageBox.ShowError(@"This is an error message");

    Error Message

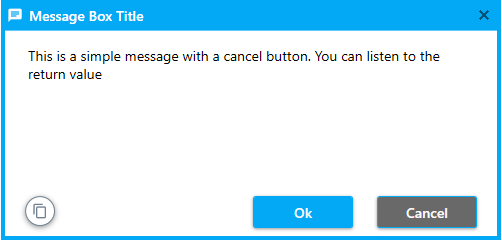
    Capturing Message Box Results

    var result = MaterialMessageBox.ShowWithCancel($"This is a simple message with a cancel button. You can listen to the return value", "Message Box Title");

    Capturing Message Box Results

    Styling a message box

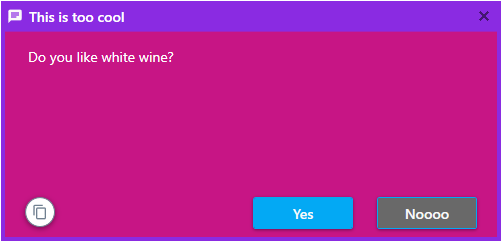
    CustomMaterialMessageBox msg = new CustomMaterialMessageBox
    {
        TxtMessage = { Text = "Do you like white wine?", Foreground = Brushes.White },
        TxtTitle = { Text = "This is too cool", Foreground = Brushes.White },
        BtnOk = { Content = "Yes" },
        BtnCancel = { Content = "Noooo" },
        MainContentControl = { Background = Brushes.MediumVioletRed },
        TitleBackgroundPanel = { Background = Brushes.BlueViolet },
    
        BorderBrush = Brushes.BlueViolet
    };
    
    msg.Show();
    MessageBoxResult results = msg.Result;

    Capturing Message Box Results

    ❇️ Toolkits used

    This library is built on top of the following toolkits:

    • Material Design In XAML Toolkit – Comprehensive and easy to use Material Design theme and control library for the Windows desktop.
    • Material Design Colors – ResourceDictionary instances containing standard Google Material Design swatches, for inclusion in a XAML application.

    ❇️ Contributing to this project

    If you’ve improved Material Message Box and think that other people would enjoy it, submit a pull request. Anyone and everyone is welcome to contribute.


    ❇️ Licence

    The MIT License (MIT)

    Copyright (c) 2021, Bespoke Fusion

    Permission is hereby granted, free of charge, to any person obtaining a copy of this software and associated documentation files (the “Software”), to deal in the Software without restriction, including without limitation the rights to use, copy, modify, merge, publish, distribute, sublicense, and/or sell copies of the Software, and to permit persons to whom the Software is furnished to do so, subject to the following conditions:

    The above copyright notice and this permission notice shall be included in all copies or substantial portions of the Software.

    THE SOFTWARE IS PROVIDED “AS IS”, WITHOUT WARRANTY OF ANY KIND, EXPRESS OR IMPLIED, INCLUDING BUT NOT LIMITED TO THE WARRANTIES OF MERCHANTABILITY, FITNESS FOR A PARTICULAR PURPOSE AND NONINFRINGEMENT. IN NO EVENT SHALL THE AUTHORS OR COPYRIGHT HOLDERS BE LIABLE FOR ANY CLAIM, DAMAGES OR OTHER LIABILITY, WHETHER IN AN ACTION OF CONTRACT, TORT OR OTHERWISE, ARISING FROM, OUT OF OR IN CONNECTION WITH THE SOFTWARE OR THE USE OR OTHER DEALINGS IN THE SOFTWARE.

    ❤️

    Visit original content creator repository https://github.com/denpalrius/Material-Message-Box