Author: 3ul7q9dn0uo3

  • boinc_mgr.lua

    SYNOPSIS

    boinc_mgr.lua is a menu-driven text-mode lua program for managing the boinc client app. It requires libUseful (at least version 4.0) and libUseful-lua (at least version 2.18) to be installed. boinc_mgr.lua can start and stop the boinc client app on local host, can join, attach, and detach from projects, and can start/stop tasks. It can also attach to boinc over tcp, and over tcp-over-ssh.

    Menus are navigated using either the arrow keys, or ctrl-WASD keys (the latter requires a libUseful version > 4.52).

    USAGE

    boinc_mgr.lua [host] [-key gui-key] [-user username] [-email email-address] [-pass password] [-save]
    
    host  -  host to connect to. e.g. "tcp:192.168.2.1" or "ssh:myserver"
    
    -key [gui-key]    This supplies the gui-key for a boinc process. This is needed for most control operations.
                      This key is normally found in the file "gui_rpc_auth.cfg" in whatever directory the boinc
                      process is running in.
     
    -save             save the gui-key.
    
    -acct_mgr [url]   Set account manager. This requires -user and -pass for the account manager login. 
                      '-acct_mgr none' disconnects from any currently configured account manager.
    
    -user  [name]     Username. Needed for creating/joining project accounts and other management tasks.
    -email [email]    email address. Needed for creating/joining project accounts
    -pass  [passwd]   password. Needed for creating/joining project accounts and other management tasks.


    Assuming you’ve used the same user, email and pass for all projects, the user, email, and pass can be set within the program itself, so that they don’t need to be passed on the command-line every time. The gui-key can be saved on a per-host basis by using the “-save” option. This will save the key for the current host in “~/.boinc/keys.txt”, allowing multiple hosts to be accessed without needing to pass in the key.

    If you’re using an account manager you can set it by passing the url with the -acct_mgr option. This also requires the ‘-user’ and ‘-pass’ options to supply the username and password for the account manager. Once the account manager is set these options do not need to be passed in again, and the username and password are never stored on disk.

    You can set things back to having no account manager with ‘-acct_mgr none’.

    Hosts that are accessed via SSH must be configured in the ~/.ssh/config file with an ssh key.

    If run without any arguments the program will try to connect to a boinc process at “tcp:localhost”. If it can’t connect it will offer to start a new boinc process in “~/.boinc” and store the key for it.

    REMOTE BOINC

    Boinc manager can connect to boinc processes running on remote machines, either over tcp, or over ssh. The default port for boinc is 31416, so this

    boinc_mgr.lua tcp:192.168.2.10 -key boinc-key.192.168.2.10
    

    Would connect to a remote boinc at 192.168.2.10.

    If a nonstandard port is in use, (e.g. 3333) the command-line becomes:

    boinc_mgr.lua tcp:192.168.2.10:3333 -key boinc-key.192.168.2.10
    

    Obviously for tcp connections the boinc service must be connectable (firewall open for the appropriate port).

    Alternatively boinc can use ssh tunneling:

    boinc_mgr.lua ssh:myboinchost -key boinc-key.myboinchost
    

    For this to work, ‘myboinchost’ must be set up as a preconfigured host in ~/.ssh/config

    ssh connections expect to tunnel via ssh to the default boinmc port on the remote machine.

    Note that in all these cases you need to have a copy of the boinc key for the boinc process on the machine that is running boinc_mgr, and supply that via the ‘-key’ command-line argument.

    SCREENSHOT

    Screenshot of boinc_mgr.lua

    Visit original content creator repository https://github.com/ColumPaget/boinc_mgr.lua
  • boinc_mgr.lua

    SYNOPSIS

    boinc_mgr.lua is a menu-driven text-mode lua program for managing the boinc client app. It requires libUseful (at least version 4.0) and libUseful-lua (at least version 2.18) to be installed. boinc_mgr.lua can start and stop the boinc client app on local host, can join, attach, and detach from projects, and can start/stop tasks. It can also attach to boinc over tcp, and over tcp-over-ssh.

    Menus are navigated using either the arrow keys, or ctrl-WASD keys (the latter requires a libUseful version > 4.52).

    USAGE

    boinc_mgr.lua [host] [-key gui-key] [-user username] [-email email-address] [-pass password] [-save]
    
    host  -  host to connect to. e.g. "tcp:192.168.2.1" or "ssh:myserver"
    
    -key [gui-key]    This supplies the gui-key for a boinc process. This is needed for most control operations.
                      This key is normally found in the file "gui_rpc_auth.cfg" in whatever directory the boinc
                      process is running in.
     
    -save             save the gui-key.
    
    -acct_mgr [url]   Set account manager. This requires -user and -pass for the account manager login. 
                      '-acct_mgr none' disconnects from any currently configured account manager.
    
    -user  [name]     Username. Needed for creating/joining project accounts and other management tasks.
    -email [email]    email address. Needed for creating/joining project accounts
    -pass  [passwd]   password. Needed for creating/joining project accounts and other management tasks.


    Assuming you’ve used the same user, email and pass for all projects, the user, email, and pass can be set within the program itself, so that they don’t need to be passed on the command-line every time. The gui-key can be saved on a per-host basis by using the “-save” option. This will save the key for the current host in “~/.boinc/keys.txt”, allowing multiple hosts to be accessed without needing to pass in the key.

    If you’re using an account manager you can set it by passing the url with the -acct_mgr option. This also requires the ‘-user’ and ‘-pass’ options to supply the username and password for the account manager. Once the account manager is set these options do not need to be passed in again, and the username and password are never stored on disk.

    You can set things back to having no account manager with ‘-acct_mgr none’.

    Hosts that are accessed via SSH must be configured in the ~/.ssh/config file with an ssh key.

    If run without any arguments the program will try to connect to a boinc process at “tcp:localhost”. If it can’t connect it will offer to start a new boinc process in “~/.boinc” and store the key for it.

    REMOTE BOINC

    Boinc manager can connect to boinc processes running on remote machines, either over tcp, or over ssh. The default port for boinc is 31416, so this

    boinc_mgr.lua tcp:192.168.2.10 -key boinc-key.192.168.2.10
    

    Would connect to a remote boinc at 192.168.2.10.

    If a nonstandard port is in use, (e.g. 3333) the command-line becomes:

    boinc_mgr.lua tcp:192.168.2.10:3333 -key boinc-key.192.168.2.10
    

    Obviously for tcp connections the boinc service must be connectable (firewall open for the appropriate port).

    Alternatively boinc can use ssh tunneling:

    boinc_mgr.lua ssh:myboinchost -key boinc-key.myboinchost
    

    For this to work, ‘myboinchost’ must be set up as a preconfigured host in ~/.ssh/config

    ssh connections expect to tunnel via ssh to the default boinmc port on the remote machine.

    Note that in all these cases you need to have a copy of the boinc key for the boinc process on the machine that is running boinc_mgr, and supply that via the ‘-key’ command-line argument.

    SCREENSHOT

    Screenshot of boinc_mgr.lua

    Visit original content creator repository
    https://github.com/ColumPaget/boinc_mgr.lua
  • Megumin.Net

    这是什么?

    这是一个 简单易用的 网络库。
    这是一个网络模块的通用解决方案。设计目的为应用程序网络模块提供统一的HighLevel接口。

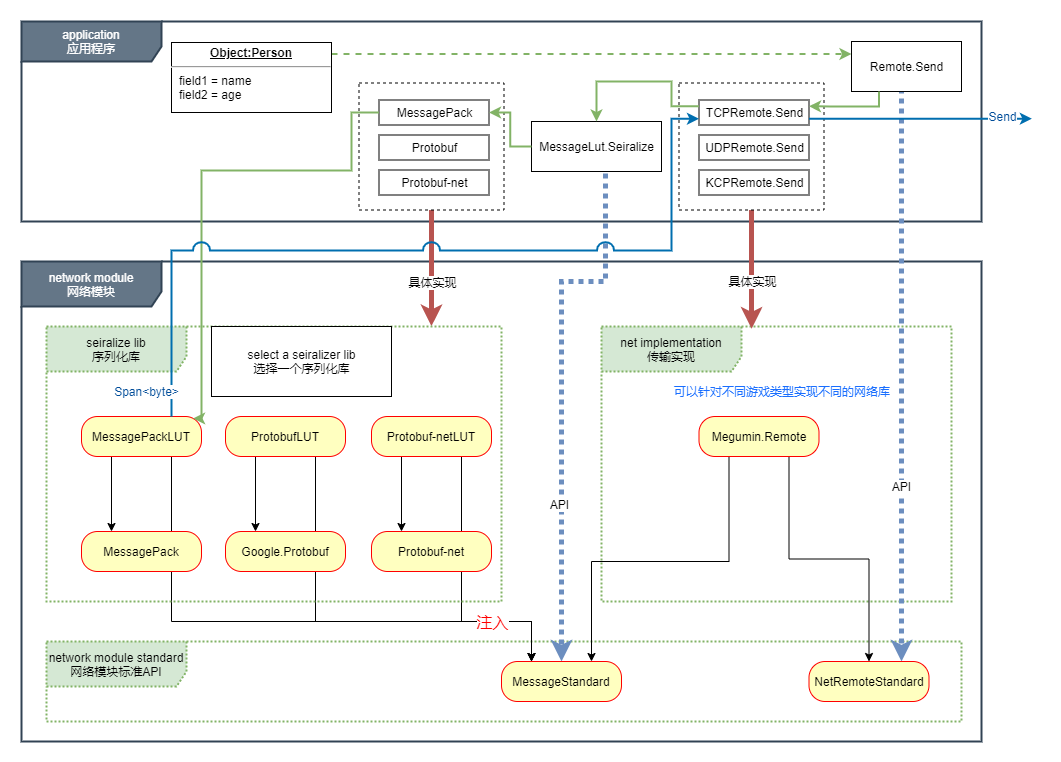
    整个类库被拆分为多个dll。简单来说:NetRemoteStandard.dll是标准,里面只有接口定义;Megumin.Remote.dll是一种实现。类比于dotnetStandard和dotnetCore的关系。

    为什么要拆分为多个dll?
    具体实现可能需要依赖很多其他dll,而接口定义并不需要这些依赖。对于只想使用接口,自定义实现的用户来说,引入额外的依赖是不必要的。例如MessageStandard,用户仅引用自己选择的序列化库即可,而不必引用多个序列化库。

    依赖关系


    它是开箱即用的么?

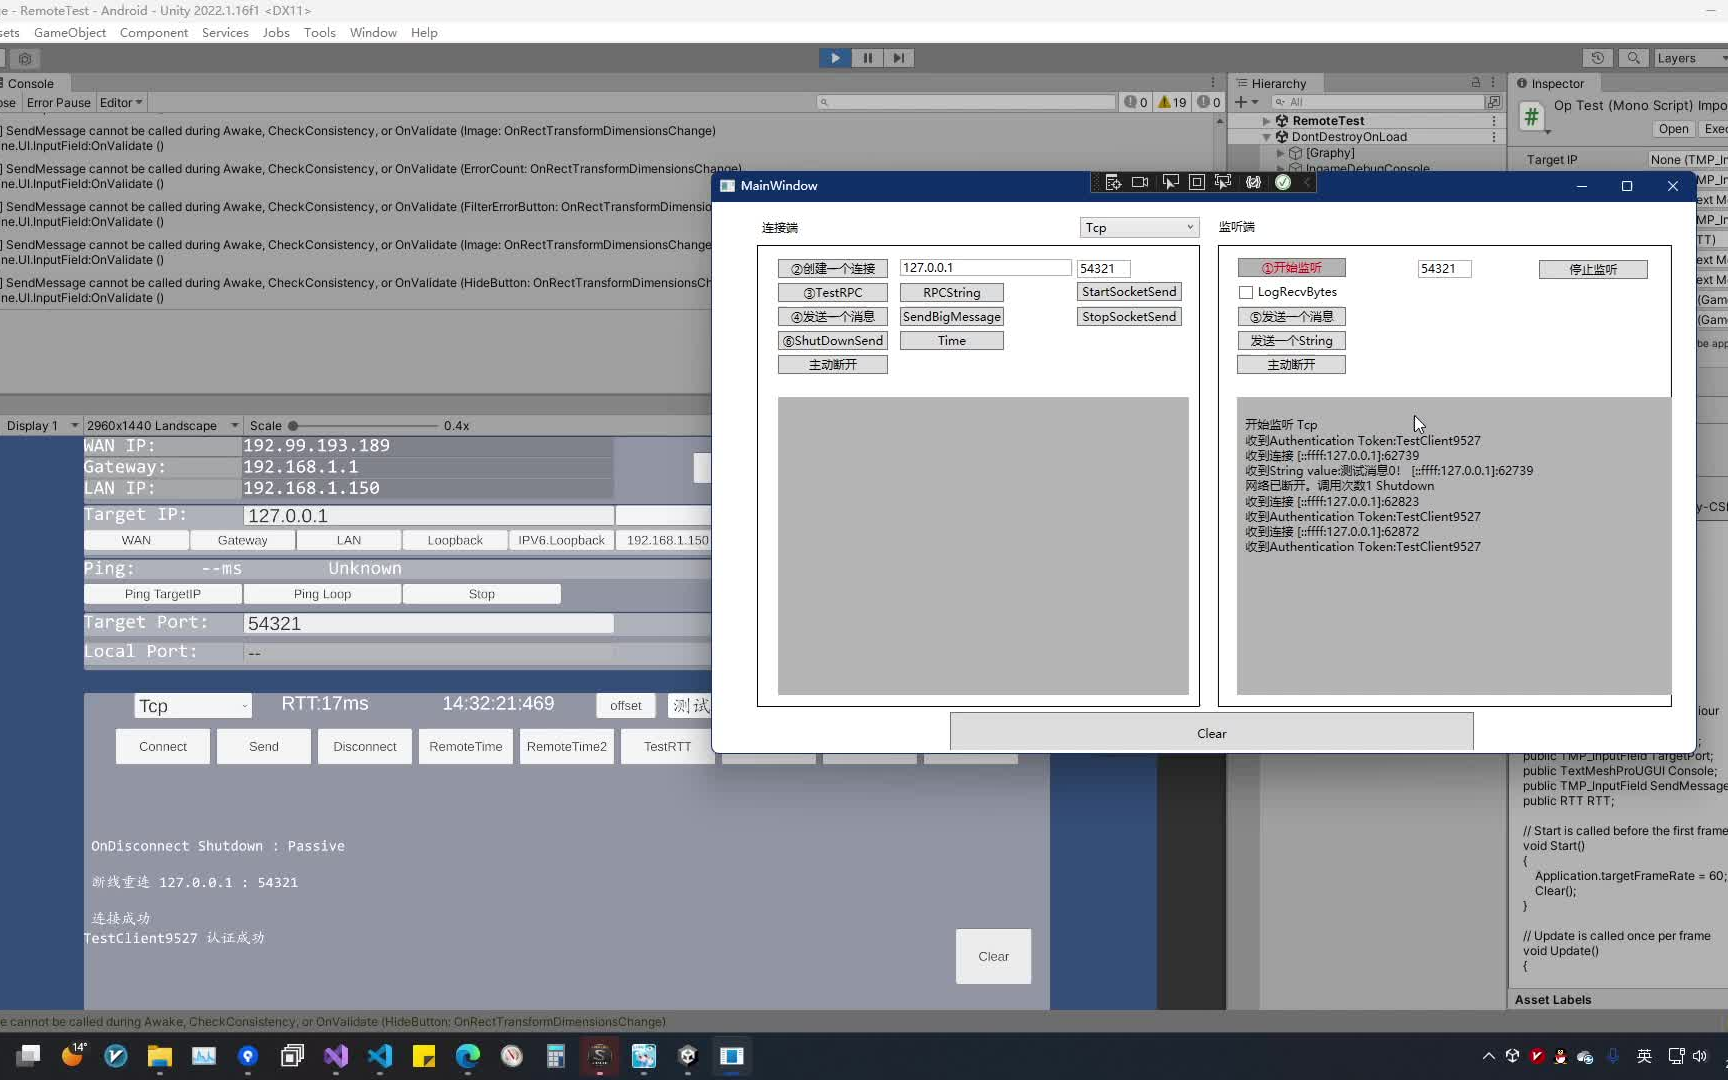
    是的,使用Nuget获取Megumin.Remote。但是注意,需要搭配序列化库,不同的序列化库可能有额外的要求。
    由于使用了C# 7.3语法,在unity中如果使用源码至少需要2018.3。
    目标框架netstandard2.1,在unity中建议unity版本2021.2以上。过小的版本可以使用源码,但需要自行解决依赖关系。

    UPM Package

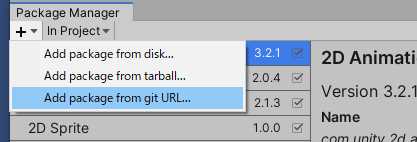
    Install via git URL

    image

    or add "com.megumin.net": "https://github.com/KumoKyaku/Megumin.Net.git?path=UnityPackage/Packages/Net" to Packages/manifest.json.

    If you want to set a target version, uses the *.*.* release tag so you can specify a version like #2.1.0. For example https://github.com/KumoKyaku/Megumin.Net.git?path=UnityPackage/Packages/Net#2.1.0.

    快速入门


    优势

    • 支持Tcp,Udp,Kcp。
    • 使用内存池和多线程处理收发,可配置线程调度,无需担心网络模块性能问题。
    • 内置Rpc。
    • 可以搭配不同的序列化类库,甚至不用序列化库。
    • AOT/IL2CPP可用。
    • 可重写的消息管线,专业程序员可以针对具体功能进一步优化。
    • 接口分离。[Dependency injection] 应用程序可以仅使用NetRemoteStandard.dll编码,然后使用Megumin.Remote.dll的具体实现类注入,当需要切换协议或者序列化类库时,应用程序逻辑无需改动。
    • IOCP开销和消息调度转发延迟之间有很好的平衡。
    • 自定义MiniTask池,针对网络功能对Task重新实现,性能更高,仅初始化时alloc。
    • 支持Span<T>。使用System.IO.Pipelines作为高性能IO缓冲区。
    • 纯C#实现,这是学习网络功能一个好的起点。
    • 3.0 版本 API设计经过真实业务需求改良。
    • MIT许可证

    劣势

    • 目前为止类库还很年青,没有经过足够的商业项目测试。
    • 不持支 WebGL Networking
    • 对于非程序人员仍然需要一些学习成本。独立游戏作者用起来还是有一定难度的。


    核心方法3个

    设计原则:最常用的代码最简化,复杂的地方都封装起来。
    发送一个消息,并等待一个消息返回 是类库的全部内容。


    从结果值返回异常是有意义的:

    • 省去了try catch ,写法更简单,避免try catch 控制流。(注意,没有提高处理异常的性能)
    • 用来支持异常在分布式服务器中传递。
    ///实际使用中的例子
    
    IRemote remote = new TCPRemote(); ///省略连接代码……
    public async void TestSend()
    {
        Login login = new Login() { Account = "LiLei", Password = "HanMeiMei" };
        ///                                         泛型类型为期待返回的类型
        var (result, exception) = await remote.SendAsync<LoginResult>(login);
        ///如果没有遇到异常,那么我们可以得到远端发回的返回值
        if (exception == null)
        {
            Console.WriteLine(result.IsSuccess);
        }
    }

    2. ISendAsyncable.SendAsyncSafeAwait

    方法签名:

    ValueTask<Result> SendAsyncSafeAwait<Result>(object message, object options = null, Action<Exception> onException = null);  

    结果值是保证有值的,如果结果值为空或其他异常,触发异常回调函数,不会抛出异常,所以不用try catch。异步方法的后续部分不会触发,所以后续部分可以省去空检查。
    注意:这不是语言特性,也不是异步编程特性,这依赖于具体Remote的实现,这是类库的特性。如果你使用了这个接口的其他实现,要确认实现遵守了这个约定。

    IRemote remote = new TCPRemote(); ///省略连接代码……
    public async void TestSend()
    {
        Login login = new Login() { Account = "LiLei", Password = "HanMeiMei" };
        ///                                           泛型类型为期待返回的类型
        LoginResult result = await remote.SendAsyncSafeAwait<LoginResult>(login, (ex)=>{});
        ///后续代码 不用任何判断,也不用担心异常。
        Console.WriteLine(result.IsSuccess);
    }

    多类型等待与模式匹配

    虽然不推荐一个请求对应多个回复类型,但是某些业务设计仍然有此需求。比如将所有errorcode作为一个独立类型回复,那么一个请求就有可能有对应回复和errorcode两个回复类型。

    protobuf协议中可以使用 IMessage接口 作为等待返回的类型。

    class ErrorCode{}
    class Resp{}
    class Req{}
    
    async void Test(IRemote remote){
        Req req = new Req();
        ///泛型中填写所有期待返回类型的基类,然后根据类型分别处理。
        ///如果泛型处仅使用一种类型,那么服务器回复另一种类型时,底层会转换为 InvalidCastException 进如异常处理逻辑。
        var ret = await remote.SendAsyncSafeAwait<object>(req);
        if(ret is ErrorCode ec)
        {
    
        }
        else if(ret is Resp resp)
        {
    
        }
    }

    3. ValueTask<object> OnReceive(short cmd, int messageID, object message);

    接收端回调函数

    protected virtual async ValueTask<object> OnReceive(short cmd, int messageID, object message)
    {
        switch (message)
        {
            case TestPacket1 packet1:
                Console.WriteLine($"接收消息{nameof(TestPacket1)}--{packet1.Value}"); 
                return null;
            case Login login:
                Console.WriteLine($"接收消息{nameof(Login)}--{login.Account}");
                return new LoginResult { IsSuccess = true };
            case TestPacket2 packet2:
                return new TestPacket1 { Value = packet2.Value };
            default:
                break;
        }
        return null;
    }

    注意: 异步发送方法等待的返回值虽然也是接收到的消息,但是会被分发到异步函数回调中,不会触发本函数。即使异步发送方法没有使用await关键字而导致异步后续没有注册,返回消息也不会触发本函数,返回消息将被忽略。 (事实上,很难实现找不到异步后续时将消息分发到此函数中。因为不持有返回的Task引用时,想要将消息转送到本回调函数,需要对Task增加额外的标记,生命周期难以控制,控制流会变得更难以理解。详细情况参阅源码RpcCallbackPool.CreateCheckTimeout)


    4. 由发送端和消息协议控制的的响应机制

    具体响应方式参考PreReceive函数源码,参考IPreReceiveable,ICmdOption,SendOption.Echo等。
    Heartbeat,RTT,Timestamp Synchronization等功能都由此机制实现。

    • 在某些时候,比如测试消息是否正常收发,发送端可能希望远端做出特定方式的响应,比如echo,将消息原样返回。
      这种需求不是针对某一个特定消息类型的,也不是对于某个消息类型永远做出这样的响应,可能仅仅是针对某个时刻的某条消息。
      对于这样的需求,在OnReceive函数中实现并不合适,没有办法根据消息类型进行抽象。
      • 通过CmdID == 1 << 0来实现。发送时指定option参数,option实现ICmdOption,将CmdID传递到底层报头中。
      • 通过IPreReceiveable.PreReceiveType == 1来实现,发送的消息协议实现IPreReceiveable接口,并且PreReceiveType的值等于1。
      • 接收端在PreReceive函数中处理,并决定此消息是否继续传递到OnReceive函数中。
    • 在另一些时候,更通用的是,发送端发出一个消息,但是处于一些特殊原因,不希望将响应函数写在OnReceive函数中。
      可以通过消息协议继承IAutoResponseable接口实现,并且PreReceiveType == 2。
      接收端PreReceive函数中处理此类消息,并调用GetResponse返回结果到发送端。
      public interface IAutoResponseable : IPreReceiveable
      {
          ValueTask<object> GetResponse(object request);
      }
      • 比如消息协议是跨项目的,但是OnReceive函数不是。
      • 比如一些简单并且通用的基础函数调用,不想污染OnReceive函数。GetTime,GetSystemInfo等。但又不想将这些功能内置到网络模块中。


    重要

    • 线程调度
      Remote 使用bool UseThreadSchedule(int rpcID, short cmd, int messageID, object message)函数决定消息回调函数在哪个线程执行,true时所有消息被汇总到Megumin.ThreadScheduler.Update。
      你需要轮询此函数来处理接收回调,它保证了按接收消息顺序触发回调(如果出现乱序,请提交一个BUG)。Unity中通常应该使用FixedUpdate。
      如果你的消息在分布式服务器之间传递,你可能希望消息在中转进程中尽快传递,那么 false时接收消息回调使用Task执行,不必在轮询中等待,但无法保证有序,鱼和熊掌不可兼得。

      ///建立主线程 或指定的任何线程 轮询。(确保在unity中使用主线程轮询)
      ///ThreadScheduler保证网络底层的各种回调函数切换到主线程执行以保证执行顺序。
      ThreadPool.QueueUserWorkItem((A) =>
      {
          while (true)
          {
              ThreadScheduler.Update(0);
              Thread.Yield();
          }
      });
    • Message.dll
      (AOT/IL2CPP)当序列化类以dll的形式导入unity时(因为有时会将消息类库设计成unity外的共享工程),必须加入link文件,防止序列化类属性的get,set方法被il2cpp剪裁。重中之重,因为缺失get,set函数不会报错,错误通常会被定位到序列化库的多个不同位置(我在这里花费了16个小时)。

        <linker>
            <assembly fullname="Message" preserve="all"/>
        </linker>
      

    报头

    • Udp,Kcp 不用处理粘包,所以报头不含有TotalLength,TotalLength改为1字节的消息种类识别码,具体参照源码。
    • 使用小端字节序写入报头。BinaryPrimitives.WriteInt32LittleEndian。
    • TotalLength = 4 + 4 + 2 + 4 + bodyLength。
    TotalLength(value including total length 4 byte) RpcID CMD MSGID Body
    总长度(值包含总长度自身的4个字节) 消息ID 消息正文
    Int32(int) Int32(int) Int16(short) Int32(int) byte[]
    4byte 4byte 2byte 4byte byte[].Lenght
    • 与其他语言或者网络库对接
      当服务器不使用本库,或者不是C#语言时。满足报头格式,即可支持本库所有特性。

    MessagePipeline是什么?

    MessagePipeline 是 Megumin.Remote 分离出来的一部分功能。
    它也可以理解为一个协议栈。
    它决定了消息收发具体经过了哪些步骤,可以自定义MessagePipeline并注入到Remote,用来满足一些特殊需求。
    例如:

    • 消息反序列化前转发。
    • 使用返回消息池来实现接收过程构造返回消息实例无Alloc(这需要序列化类库的支持和明确的生命周期管理)。
      你可以为每个Remote指定一个MessagePipeline实例,如果没有指定,默认使用MessagePipeline.Default。

    2.0 版本删除MessagePipeline,改为多个Remote实现中可重写的函数,在工程实践中发现,将消息管线与Remote拆离没有意义,是过度设计。如果需要同时定制3个协议Remote的管线,可以由用户自行拆分,框架不做处理。

    人生就是反反复复。
    3.0版本决定改回最开始设计,第一版本的设计思路更好。
    经过工程实践发现,2.0的设计并不方便重写,用户相同的重写代码在针对不同的协议时需要重写多份,分别从TcpRemote,UdpRemote,Kcpremote继承,每次修改时也要同时修改多份,十分笨重。
    用户主要重写接收消息部分和断线部分,断线重连部分针对不同协议处理方式也不同。
    所以将Transport和IDisconnectHandler从Remote拆分出来。
    本质上说,3.0的Remote等于1.0的MessagePipeline。3.0的Transport等于1.0的Remote。

    MessageLUT是什么?

    MessageLUT(Message Serialize Deserialize callback look-up table)是MessageStandard的核心类。MessagePipeline 通过查找MessageLUT中注册的函数进行序列化。因此在程序最开始你需要进行函数注册

    通用注册函数:

    void RegistIMeguminFormatter<T>(KeyAlreadyHave key = KeyAlreadyHave.Skip) where T : class, IMeguminFormatter, new() 

    序列化类库的中间件基于MessageLUT提供多个简单易用的API,自动生成序列化和反序列化函数。需要为协议类添加一个MSGIDAttribute来提供查找表使用的ID。因为一个ID只能对应一组序列化函数,因此每一个协议类同时只能使用一个序列化库。

    namespace Message
    {
        [MSGID(1001)]       //MSGID 是框架定义的一个特性,注册函数通过反射它取得ID
        [ProtoContract]     //ProtoContract     是protobuf-net 序列化库的标志
        [MessagePackObject] //MessagePackObject 是MessagePack  序列化库的标志
        public class Login  //同时使用多个序列化类库的特性标记,但程序中每个消息同时只能使用一个序列化库
        {
            [ProtoMember(1)]    //protobuf-net  从 1 开始
            [Key(0)]            //MessagePack   从 0 开始
            public string Account { get; set; }
            [ProtoMember(2)]
            [Key(1)]
            public string Password { get; set; }
        }
        [MSGID(1002)]
        [ProtoContract]
        [MessagePackObject]
        public class LoginResult
        {
            [ProtoMember(1)]
            [Key(0)]
            public bool IsSuccess { get; set; }
        }
    }
    • JIT环境下可以直接注册一个程序集

      private static async void InitServer()
      {
          //MessagePackLUT.Regist(typeof(Login).Assembly);
          Protobuf_netLUT.Regist(typeof(Login).Assembly);
          ThreadPool.QueueUserWorkItem((A) =>
          {
              while (true)
              {
                  ThreadScheduler.Update(0);
                  Thread.Yield();
              }
      
          });
      }
    • AOT/IL2CPP 环境下需要显示通过泛型函数注册每一个协议类,以确保在AOT/IL2CPP编译器在静态分析时生成对应的泛型函数。

      public void TestDefine()
      {
          Protobuf_netLUT.Regist<Login>();
          Protobuf_netLUT.Regist<LoginResult>();
      }

      注意:
      序列化库使用代码生成器生成代码,是生成类型实际的序列化函数。
      而这里是为了静态分析时生成序列化类库通用API的泛型函数。

      例如:ProtoBuf.Serializer.Serialize<T>() 生成为ProtoBuf.Serializer.Serialize<Login>()

      两者不相同。

    支持的序列化库(陆续添加中)

    每个库有各自的限制,对IL2CPP支持也不同。框架会为每个支持的库写一个继承于MessageStandard/MessageLUT的新的MessageLUT.
    由于各个序列化库对Span<byte>的支持不同,所以中间层可能会有轻微的性能损失.

    对于序列化函数有三种形式:

    1. 代码生成器生成代码
      { protobuf ,MessagePack mpc.exe }
    2. 通过反射每个字段组合
      { protobuf-net .NET Standard 1.0 }
    3. JIT 生成
      { protobuf-net , MessagePack }
    • IL2CPP 请使用.NET Standard 1.0,其他运行时可能无法构建。虽然是反射模式,但是对于客户端来说并没有性能问题,于此同时服务器可以使用 .NET Standard 2.0。
      unity无头模式服务器应该考虑其他库。


    一些细节

    • RPC功能:保证了请求和返回消息一对一匹配。发送时RPCID为负数,返回时RPCID*-1 为正数,用正负区分上下行。
      • 0和int.minValue为无效RPCID值。
      • 0是普通消息。int.minValue是广播消息。
    • 内存分配:通过使用内存池,减少alloc。
    • 发送过程数据拷贝了2次,接收过程数据无拷贝(各个序列化类库不同)。 2.0版本中做了调整。
    • 内存池:标准库内存池,ArrayPool<byte>.Shared
    • 序列化:使用type做Key查找函数。
    • 反序列化:使用MSGID(int)做Key查找函数。
    • 内置了string,int,long,float,double,DateTimeOffset等类型序列化支持,即使不使用序列化类库,也可以直接发送它们。
    • MessageLUT.Regist<T>函数手动添加其他类型。
      如果不想用序列化库,也可以使用Json通过string发送。
    • 消息类型:尽量不要使用大的自定义的struct,整个序列化过程有可能导致多次装箱拆箱。在参数传递过程中还会多次复制,性能比class低。
    • 多目标框架支持 <TargetFrameworks>netstandard2.0;netstandard2.1;net5;net6</TargetFrameworks>

    3.0版本

    • Remote:负责序列化和Rpc,消息接收。
    • Transport:负责传输层数据收发。
    • IDisconnectHandler: 负责断线处理。

    时间和空间上的折衷

    序列化之前无法确定消息大小,因此需要传递一个足够大的buffer到序列化层。如果不进行拷贝,直接将整个大buffer传递到发送层,由于异步特性,无法准确得知发送过程的生命周期,可能在发送层积累大量的大buffer,严重消耗内存,因此类库在序列化层和发送层之间做了一次拷贝。
    2.0版本 使用IBufferWriter<byte>ReadOnlySequence<byte>解决了这个问题,效率更高。

    效率

    • 0.2版本。没有精确测试,Task的使用确实影响了一部分性能,但是是值得的。经过简单本机测试单进程维持了15000+ Tcp连接。
    • 2.0版本性能可能会比之前版本低一些,还没有实际测试。
    • 3.0版本性能得到极大优化,超过历史版本。性能上可以满足99%的项目。
      本机测试Tcp峰值达到15000+连接,收发26000 0000 字节每秒,网络模块性能已经不在是问题。
      Kcp只能3000~5000连接,再多就会爆内存,具体要能维持多少连接,要看数据流量。

    其他信息

    这是写类库途中总结到的知识或者猜测:

    • public virtual MethodInfo MakeGenericMethod(params Type[] typeArguments);
      在IL2CPP下可用,但是不能创造新方法。如果这个泛型方法在编译期间确定,那么此方法可用。否则找不到方法。
    • IL2CPP不能使用dynamic关键字。
    • 异步编程两个核心关键字理解
      • await == UnsafeOnCompleted == 将下文代码包装成回调函数注册到Task中。
        记住 await 时才调用 UnsafeOnCompleted即可。
      • async == AsyncTaskMethodBuilder.Create().Task,并在方法末尾SetResult。
        async是隐藏的生成一个Task/ValueTask。

    Megumin.Remote是以MMORPG为目标实现的。对于非MMORPG游戏可能不是最佳选择。 在遥远的未来也许会针对不同游戏类型写出NetRemoteStandard的不同实现。

    工程实现需要,但本库没有实现的功能

    • 同时监听IPV4,IPV6。
    • 同时监听Tcp,Udp。
    • 同时监听多个端口,用于实现负载均衡。

    internal buffer / kernel buffer


    友情链接

    • Kcp 类库所依赖的Kcp实现。

    参考

    • clumsy 能在 Windows 平台下人工造成不稳定的网络状况,方便你调试应用程序在极端网络状况下的表现。
    Visit original content creator repository https://github.com/KumoKyaku/Megumin.Net
  • quickphotoalbum

    Quick Photo Album

    A front-end-only approach to creating quick photo albums, powered by Cloudinary for image management, organisation, manipulation, optimisation and delivery.

    Live example : https://quickphotos.page/
    ^^ Try searching for: cars, sunsets or motorbikes

    1. The page initially loads a placeholder tags and content
    2. Querystring parameter for ‘album’ drives the page logic
    3. A /list API request is made to Cloudinary based on the ‘album’ value
    4. JSON response is returned, and parsed to manipulate the DOM accordingly, including image requests
    5. Images are subsequently requested from Cloudinary
    6. Album details are managed via a seperate .json file {album}-album-details.json
    7. Additionally a light box also enables images to be seen bigger, including fullscreen, and also a slideshow
    8. Alt text can also be managed via asset contextual metadata
    9. Also including multi-lingual alt-tags

    Deploy with Vercel

    ++++++++++++++++++++++++++++
    To use with your own account, make 1 change :
    live.html
    62: const cloud_name = ‘quickalbum’;
    ^^ Change this to your Cloudinary cloudname ^^
    and ensure you have list API enabled
    ++++++++++++++++++++++++++++

    ** Notes **

    1. Cloudinary provides generous free accounts which could be sufficient to power many projects, but if your storage, bandwidth or transforms exceed the available free credits, there are likely to be costs in utilising the service further
    2. /list API is NOT enabled by default on Cloudinary accounts

    Javascript lightbox gallery from: https://sachinchoolur.github.io/lightgallery.js/ // for commercial usage, please see their license details

    Some demo example media via: https://unsplash.com/

    Visit original content creator repository https://github.com/22940dev/quickphotoalbum
  • netbox-scanner

    Visit original content creator repository
    https://github.com/guanana/netbox-scanner

  • PKUHoleCommunity

    PKU Hole Community

    P 大树洞网页版社区分支

    (简称“树洞社区版”)

    GitHub tag (latest SemVer release) GitHub tag (latest SemVer pre-release) GitHub license GitHub contributors

    树洞网页版无疑取得了巨大的成功,占有较大的“市场份额”

    贵校有很多动手能力强的同学,也有很多同学有着对网页版树洞的独特想法。这些想法有的是合理的、巧妙的,有的是脑洞太大不切实际的;有的完全可以在客户端完成,有的则需要联系后端。

    然而官方并没有很好的处理同学们自己动手和表达想法的渠道。而且有很多呼声较高的功能迟迟不添加(毕竟一个人的精力有限)

    P 大树洞网页版社区分支(以下简称“社区版”)的定位是提供一个交流的平台,提供大家动手实现的方案,让大家自己动手实现对树洞网页版的想法。社区版并非试图取代官方版本,更多的是牺牲一部分稳定性来换取好用的功能。如果大家喜欢,乐于贡献代码或想法,社区版会继续维护下去。

    计划功能列表

    project

    更新功能列表

    (此列表跟进 beta 版)

    主要功能

    • 屏蔽词
    • 在关注列表中搜索
    • 别名,适用于给神洞等一个名字
    • 关注列表按最新回复排序
    • 可设置默认隐藏图片

    次要功能

    • 从一个洞内通过链接访问另一个洞,返回后记住原状态(即保留刷到的位置以及是否是倒序)
    • 关注列表中缓存更新了的洞会有黄点提示(通常情况下是有新的回复)
    • 侧边栏模式下禁止主时间线的滚动
    • 以文本形式复制树洞时遵从逆序和仅看

    界面/行为改变

    • 顶栏中的应用链接(成绩、不咕)目前可以正常访问,但访问时会回到官方版
    • 和 App 客户端一样受到验证限制,但提供不稳定的自动验证选项
    • 将 CNZZ 统计替换为简单且隐私友好型的 Microanalytics,所有人均可查看(有时访问数会超过月度限制,可以切换到本月视图查看本月前几天的数据)

    项目管理

    • 使用主流的代码风格
    • 配置 GitHub Actions, 利用版本号控制发布

    其他

    • 社区版提供 Beta 测试版本,登录状态与稳定版同步,但是会不稳定,试验性的新功能会优先推送到 Beta 版

    Contributing

    有更多的同学喜欢,才有动力继续开发。而且现有的社区版开发者并非 React 土著,十分欢迎有 React 经验的同学共同开发。

    社区版欢迎大家提出功能建议,或者参与到社区版的维护和更新中。相比于建议,社区版会优先考虑 PR。提出问题请到 GitHub Issue,树洞内讨论建议包含“树洞社区版”关键词。希望有能力的同学一起打造树洞社区版。

    更多事项见 CONTRIBUTING.md

    Note

    使用社区版同样应当遵守树洞规范。

    这个版本属于“自行实现你的想法”,基于 GPLv3 在 GitHub 开源。而不恰当使用此版本或利用此版本的漏洞对 PKU Helper 造成的不利影响由用户负责。作为社区版本,社区(no warranty)维护版本的安全,同时也欢迎同学实现你的想法。

    附 PKU Helper 官方的意思:

    根据GPL,你有权fork【网页版树洞前端】的代码并进行相应的修改。请注意,你的修改版本必须依然基于GPL授权,并依据此公开源码。

    根据树洞规范5.3规定,非官方客户端在PKU Helper团队认定造成不利影响,例如非法攻击服务器、盗取用户个人信息时,我们有权对其进行封禁。

    以下为原 README(注:这与访问原树洞网页版的 GitHub 链接不同,因为在某事件之后,xmcp 做了一些不同寻常的操作)


    PKU Helper 网页版 P大树洞:pkuhelper.pku.edu.cn/hole

    浏览器兼容

    下表为当前 PKU Helper 网页版的浏览器兼容目标:

    平台 Desktop Windows macOS iOS Android
    浏览器 Chrome Chromium
    (国产浏览器)
    Firefox EdgeHTML IE Safari Safari 微信
    (WebView)
    Chrome Chromium
    (WebView)
    优先兼容 76+ 最新版 12+ 最新版
    兼容 56+ 最新版 56+ 最新版 10+ 10+ 最新版 56+ 最新版
    不兼容 其他 其他 其他 其他 全部 其他 其他 其他 其他 其他

    优先兼容 指不应有 bug 和性能问题,可以 Polyfill 的功能尽可能提供,若发现问题会立刻修复。

    兼容 指不应有恶性 bug 和严重性能问题,若发现问题会在近期修复。

    不兼容 指在此种浏览器上访问本网站是未定义行为,问题反馈一般会被忽略。

    num+ 指符合版本号 num 的最新版本及后续所有版本。最新版 以 stable 分支为准。

    问题反馈

    对 PKU Helper 网页版的 bug 反馈请在相应仓库提交 Issue。

    欢迎提出功能和 UI 建议,但可能不会被采纳。根据 GPL,你有权自行实现你的想法。

    不方便在 GitHub 上说明的问题可以邮件 xmcp at pku dot edu dot cn。邮件内容可能会被公开。

    对 PKU Helper 后端服务、客户端、账号、树洞内容的反馈请联系相应人员,或邮件 helper at pku dot edu dot cn。

    License

    This program is free software: you can redistribute it and/or modify it under the terms of the GNU General Public License as published by the Free Software Foundation, either version 3 of the License, or (at your option) any later version.

    This program is distributed in the hope that it will be useful, but WITHOUT ANY WARRANTY; without even the implied warranty of MERCHANTABILITY or FITNESS FOR A PARTICULAR PURPOSE. See the GNU General Public License for more details.

    Visit original content creator repository https://github.com/AllanChain/PKUHoleCommunity
  • EQGRP-Auction-Files

    资源在以下网盘:
    Links: https://pan.baidu.com/s/1jKcPzp0
    Password: hda4

    EQGRP-Auction-Files

    完整版:the purported Equation Group(NSA下属) hack by the Shadow Brokers(影子经纪人)–234MB

    Firewall

    美国NSA方程式组织(Equation Group)被The Shadow Brokers(影子经纪人)hack出来的并免费分享的源码

    主要涉及的源码内容是针对防火墙的扫描器、漏洞利用框架等等:
    BLATSTING — 穷举爆破
    EXPLOITS — 漏洞利用代码
    OPS — 攻击操作控制工具包
    SCRIPTS — 脚本资源引用库
    TOOLS — 辅助工具包(编码转换、IP格式转换、加密解密装换等等)

    #######

    根据国外媒体的最新爆料,美国国家安全局(NSA)貌似遭到了黑客的攻击。这个黑客团伙声称他们入侵了“Equation Group”(方程式组织),并将他们从该黑客组织的计算机系统中所获取到的大部分黑客工具全部泄漏在了互联网上。

    这一黑客团伙自称为“The Shadow Brokers”(影子经纪人),目前他们已经开始在网上逐步公开盗窃所得的数据了。除此之外,该黑客团伙还表示,他们手中目前仍掌握着大量的机密数据,他们计划在网上举行一次拍卖会,并将这些机密信息出售给竞价最高的竞标者。
    我知道这一切听起来的确让人有些难以置信,但是有些安全研究专家则表示:他们对泄漏数据和黑客工具进行了分析测试,从分析结果来看,此次事件的可信度非常高。
    关于Equation Group(方程式组织)
    众所周知,Equation Group这一黑客团伙与美国国家安全局(NSA)的关系一直十分密切。而且外界也普遍认为,Equation Group是美国国家安全局的一个下属部门。很多安全研究专家表示,Equation Group这一黑客组织所拥有的技术无论是从复杂程度还是从其先进程度来看,都已经超越了目前绝大多数的黑客团体,而且该黑客组织已经活跃了二十多年了。

    根据卡巴斯基安全实验室在2015年所发表的一篇报告,卡巴斯基实验室的安全研究专家将Equation Group黑客组织形容为世界上最先进的黑客组织。Equation Group还与此前臭名昭著的Regin攻击、震网病毒(Stuxnet)攻击,以及Flame恶意软件平台有关,而且据说这些攻击活动还得到了美国政府的资助。尽管各种各样关于EquationGroup黑客组织的流言满天飞,但是这些说法从未得到过证实。
    值得注意的是,虽然卡巴斯基实验室在去年曝光了Equation Group,但是安全研究专家们当时也并没有明确表示该黑客组织在为美国国家安全局工作。由于该组织某些高调的攻击行动代号与NSA泄密者Edward Snowden(斯诺登)泄漏文件中记载的活动信息十分相似,所以外界才会怀疑该组织与NSA有关联。

    就在两天以前,“The Shadow Brokers”黑客组织已经将部分泄漏文件公布在了例如Github和Tumblr等网络平台上,但是这些文件在本篇报道发稿之前就已经被删除了。值得注意的是,在这些文件中还包括有NSA用于大规模监控活动的黑客工具在内。该黑客组织表示,如果他们收到了一百万个比特币(总价值大约为五亿六千八百万美金),那么他们就会将所有的泄漏文件全部发布出来。
    据了解,这伙黑客目前只提供了百分之六十的泄漏数据,剩下百分之四十的数据将会提供给拍卖竞价最高的人。该黑客组织表示,这些文件中包含有非常复杂的黑客工具,NSA此前曾使用过这些来进行间谍活动。The Shadow Broker发布的数据压缩后大小约为256MB,据称这些文件中还包含有一系列黑客工具,其中最早的黑客工具可以追溯到2010年。虽然外界无法立刻验证这些数据的有效性,而且也无法确定这些工具是否属于Equation Group黑客组织,但是从批处理脚本和python脚本的编码情况来看,这些数据肯定出自某些非常先进的黑客组织之手。
    除此之外,在泄漏的文件中不仅包含有C&C服务器的安装脚本和配置文件,而且还有一些针对美国路由器和防火墙等网络设备制造商(例如Cisco,Juniper和Fortinet)的黑客工具。
    根据目前所获取到的泄漏文件来看,其中有些黑客工具的名称与泄密者Edward Snowden(爱德华·斯诺登)泄漏的文档中记载的名称是相同的,例如“BANANAGLEE”和“EPICBANANA”。
    The Shadow Brokers”的黑客表示:“我们一直都在跟踪Equation Group的网络通信流量,并且成功地入侵了Equation Group。我们从他们的网络系统中发现了大量的网络武器。你可以从上图中看到,我们会给大家免费提供部分文件。所以不用怀疑,我们提供的肯定是目前世界上最好的黑客工具。”
    虽然这些泄漏文件的真实性目前还未得到证实,但是大部分安全专家都认为其可信度非常高。
    Comae Technologies网络安全公司的创始人Matt Suiche认为:“我还没有对泄漏的漏洞利用工具进行测试,但是从表面上看,这些工具的合法性是毋庸置疑的。”
    Motherboard网站认为,The Shadow Broker这一行为的具体动机目前尚不清楚,但如果这些数据是真实的,那么此次攻击事件绝对会成为历史上最严重的一次网络攻击事件了。
    为了竞拍剩下百分之四十的泄漏数据,并增加这些信息的可信度,“TheShadow Brokers”还专门发布了一份“邀请函”,并在这份“邀请函”中对这些数据进行了描述。

    Visit original content creator repository
    https://github.com/Freedom000/EQGRP-Auction-Files

  • ansible-kind

    ansible-kind

    This role will help you to setup / install kind on your system.
    Also ansible-kind supports you in creating and deleting kind clusters.

    Kind is a leightweight solution to run Kubernetes on top of Docker. You can create yourself
    a cluster setup with multiple control-planes and / or worker nodes.

    Requirements

    • Ansible 2.7 or higher.
    • ansible-kind install will only work on Debian OS family (Debian, Ubuntu…) as for now.
      Cluster management will work regardless of which Linux OS family you’re using.

    All required software for kind will be installed using this role. You don’t need to install
    software manually. For instance, Docker is needed and will be installed.

    Role Variables

    Optional variables

    Variable Name Description Default value
    kind_version Specify the kind version you want to install (e.g. v0.12.0 or v0.10.0).
    You can also specify latest.
    latest
    kind_install_dir Installation destination for the kind binary /usr/local/bin
    cluster_name Specify your kind clustername. Be aware, a cluster name must be unique. kind
    control_nodes Number of control-plane nodes that will be created using this role. 1
    worker_nodes Number of worker nodes that will be created using this role. 2

    Dependencies

    None.

    Example Playbook

    This role works using TAGs to specify if you want to install kind, create or delete
    a cluster. You may combine the TAGs as you like, but the combination of create and
    delete makes no sense.

    You can find an example playbook in this repository as ansible-kind.yml. Here are some
    examples in calling this playbook:

    - ansible-playbook ansible-kind.yml -e "HOSTS=vmkind" --tags "install, create" -e "cluster_name=mytestcluster control_nodes=3 worker_nodes=2" -k -K -u <username>
    

    This will install kind in the latest version. After the installation, a cluster
    mytestcluster will be created with 3 control-plane nodes and 2 worker nodes.

    License

    GPL 3.0

    Author Information

    ansible-kind was created by Philip Haberkern (thedatabaseme).

    Inspiration in writing this role was ansible-role-kind here.

    Visit original content creator repository
    https://github.com/thedatabaseme/ansible-kind

  • Baseball-Spectator

    Baseball-Spectator

    An iOS application to display the location and statistics of MLB players on the field in real-time.

    This brand new iOS baseball app rethinks the way spectators watch America’s pastime game. Baseball Spectator will ignite a newfound passion for baseball by providing an individualized, augmented reality experience for both newbies and devoted fans.

    Description

    Baseball Spectator is a landscape iOS application used while spectating a baseball game in person. It enhances the ball game experience of the user by allowing them to be easily versed in the stats of the current game and the stats of each player. More specifically, while the user points their camera at the field (must have a view of at least the whole infield), it provides the real-time location of each player, their corresponding individual information and statistics, and a virtual scoreboard. The target audience is either devoted baseball fans who are curious for a deeper analysis of the game or nieve fans who are simply looking for basic information about the current game.

    Capabilities

    User End

    • Display real-time position of players through a circle indicator placed underneath each player
    • Click on the player indicator to show a player info bar (player name and number)
    • Click on the player info bar to open up an expanded view of the individual player’s statistics
    • Display the current score, inning number, outs, strikes, and balls in a scoreboard in the top left
    • Click on the scoreboard to open up an expanded inning by inning scoreboard with additional game statistics
    • (For app demonstration purposes) Import your own video from storage for analysis through the import button on the top right of the screen
      Toggle between displaying stats for fielders versus batters

    Developer End

    • Retrieve realtime game stats from an MLB administered website
    • https://www.baseball-reference.com/ for player images, historic statistics, and game score information
    • Locate the coordinates of each of the players on the field, each of the infield bases, and each of the locations players are expected to be standing
    • Identify the user’s location (which stadium) using their phone GPS

    TODO (desired but uncompleted capabilities)

    • Automatically identify which base is home plate without the user manually selecting home plate
    • Identify which players are on which team (for now, the app uses a toggle button to switch between defense and offense)
    • Make the color thresholding for image processing more adaptable to varying lighting conditions (right now the thresholding works well with the exception of dark overcasting shadows — however, shadows should not be much of a problem since when large shadows start appearing on the field, the stadium light are quickly turned on, fixing the problem)

    App View Descriptions

    Main View

    Displays the scoreboard and camera footage marked up with the player indicators. This view is the central view of the app that provides navigation links/buttons pointing to the two main expanded views. If a player indicator is tapped, a brief statistics bar opens up. If the brief statistics bar is tapped, the player statistics expanded view opens up. If the scoreboard in the upper left is tapped, the scoreboard expanded view opens. It also has a toggle that allows the user to toggle between seeing the batters versus hitters.

    Scoreboad Expanded View

    Displays in a higher level of detail the current score of the game, including inning by inning scores, total errors of each team, and more.

    Player Statistics Expanded View

    Displays in a higher level of detailed information about the selected player including their picture, current game stats, 2020 season statistics, and career statistics. The view also displays a brief overview of the entire team’s statistics at the bottom including their number of wins, losses, percent wins, and current league standings.

    Visit original content creator repository
    https://github.com/Degman1/Baseball-Spectator

  • algo

    Algo

    USACO problem randomizer and trainer built for competitive programming enthusiasts.

    https://algousaco.com


    About Algo

    As more people get into competitive programming and the USACO, more resources are available to help you prepare for the competition. However, there was one piece missing- practice. It’s essential to learn the concepts and techniques, but it’s equally, if not more important, to practice them. Until I created Algo, there were two options: randomly clicking on previous contests’ problems or using train.usaco.org.

    However, clicking on problems randomly is inefficient, and train.usaco.org is incredibly outdated (most of the website hasn’t had a refresh or update since the early 2010s). So, I created Algo to help people practice USACO problems and help them get ready for the USACO.

    Algo is a web application designed to supercharge your USACO training. It randomly generates problems from past contests so that you can practice them. Algo will process and show the problems in a simple, clean interface. After solving the problem, you can submit your solution to the USACO website to check if your program works.

    Tech Stack

    Algo is built with the following:


    Contact, Feedback, Bugs, Get In Touch

    If you need to:

    • Contact Me
    • Submit Feedback
    • Make a Bug Report
    • Something Else

    Visit original content creator repository https://github.com/IMGROOT2/algo